Let’s move on to what is LAMP…??? See in this way… LAMP is the most popular open-source web development platform. Using it we can run and deploy dynamic websites and web-based applications.
LAMP stack consists of several components. Those are Apache web server, Maria DB/MySQL database, PHP /Python /Perl programming languages. It can be identified as an acronym of Linux, MariaDB/MySQL, PHP/Python/Perl. So this is where we go… In this article, we going to show the way to install Apache, MySQL, PHP,(LAMP stack) in Ubuntu 18.04 LTS server.
Using the following Ubuntu test box we going to describe this flow of steps.
- operating system: Ubuntu 18.04.1 LTS Server Edition
- IP address: 192.168.225.22/24
This our step flow to get LAMP stack…
1. Install the Apache webserver
At the entrance of the workflow, you may need to update Ubuntu using this command.
$ sudo apt update
$ sudo apt upgrade
Then using the following command install Apache server.
$ sudo apt install apache2
You can check if the Apache server is running or not using the following command.
$ sudo systemctl status apache2
Your sample output should be as follow.
apache2.service - The Apache HTTP Server
   Loaded: loaded (/lib/systemd/system/apache2.service; enabled; vendor preset: en
  Drop-In: /lib/systemd/system/apache2.service.d
           └─apache2-systemd.conf
   Active: active (running) since Tue 2019-02-05 10:48:03 UTC; 1min 5s ago
 Main PID: 2025 (apache2)
    Tasks: 55 (limit: 2320)
   CGroup: /system.slice/apache2.service
           ├─2025 /usr/sbin/apache2 -k start
           ├─2027 /usr/sbin/apache2 -k start
           └─2028 /usr/sbin/apache2 -k start

Feb 05 10:48:02 ubuntuserver systemd[1]: Starting The Apache HTTP Server...
Feb 05 10:48:03 ubuntuserver apachectl[2003]: AH00558: apache2: Could not reliably
Feb 05 10:48:03 ubuntuserver systemd[1]: Started The Apache HTTP Server.
Cheers! Now your Apache server is running successfully…
Let’s move into our sub-steps on installing the Apache webserver.
1.1 Adjust Firewall to allow apache to be the server
If you enable the UFW firewall in Ubuntu 18.04 LTS, by default apache web browser can’t be accessed from remote systems. So you may need to allow the HTTP and HTTPS ports by using the following commands.
Firstly you may need to list out the profile applications available on the Ubuntu system. It can be done through the below command.
$ sudo ufw app list
Then you may see this Output.
Available applications:
Apache
Apache Full
Apache Secure
OpenSSH
if you got this output you can see the Apache and OpenSSH applications are installed to relevant UFW profiles. Also, you can list out the detailed notice on each and every profile and its rules using this command syntax ‘ufw app info “Profile Name” ‘.
The following command will all of you to see the full profile.
$ sudo ufw app info "Apache Full"
Your sample output is like this:
Profile: Apache Full
Title: Web Server (HTTP,HTTPS)
Description: Apache v2 is the next generation of the omnipresent Apache web
server.

Ports:
80,443/tcp
According to this, you can see here Apache full profile consist of the rule to enable traffic to the ports which are 80 and 443:
Now the time to run this command and allow incoming HTTP and HTTPS traffic to profile.
$ sudo ufw allow in "Apache Full"
Rules updated
Rules updated (v6)
You can run following the command of you need to allow HTTP traffic but only on HTTP(80) traffic:
$ sudo ufw app info "Apache"
Let us move onto our next sub-step.
Read More : Web Development Course
1.2 Test Apache webserver
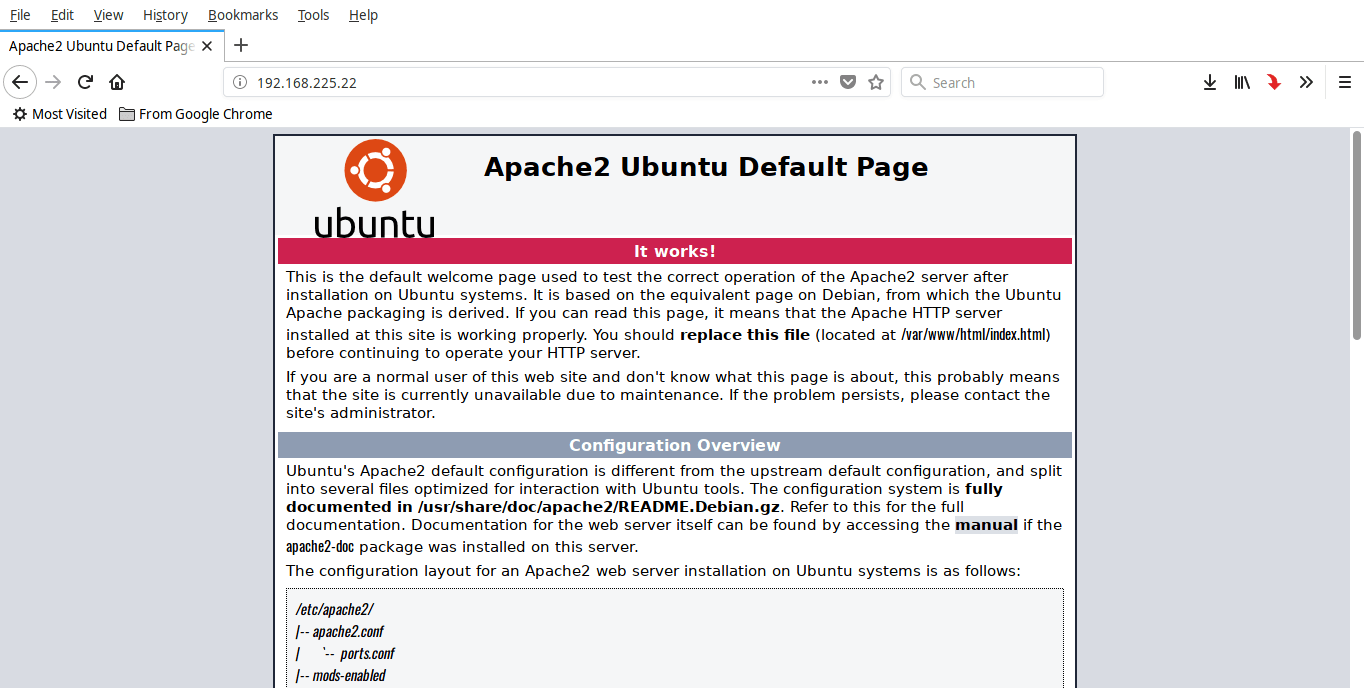
By navigating http://localhost/ or http://IP-Address/ open the web browser and access the apache test page.

If you see this on your screen it is no issue to go ahead with this workflow. It means your Apache server is working properly.
2. Install MySQL
Using the following command you can install MySQL on the Ubuntu system.
$ sudo apt install mysql-server
To get surely confirmation on the fact that MySQL running or not properly, You may need to run this command.
$ sudo systemctl status mysql
Then your sample output is like this.
mysql.service - MySQL Community Server
Loaded: loaded (/lib/systemd/system/mysql.service; enabled; vendor preset: enab
Active: active (running) since Tue 2019-02-05 11:07:50 UTC; 17s ago
Main PID: 3423 (mysqld)
Tasks: 27 (limit: 2320)
CGroup: /system.slice/mysql.service
└─3423 /usr/sbin/mysqld --daemonize --pid-file=/run/mysqld/mysqld.pid

Feb 05 11:07:49 ubuntuserver systemd[1]: Starting MySQL Community Server...
Feb 05 11:07:50 ubuntuserver systemd[1]: Started MySQL Community Server.
cheers on our effort it works successfully.
here’s the first sub-step.
2.1. Setup a Database Administrative user(Root) password.
You will get blank passcode by default in MySQL. To secure your MySQL server, need to run this command.
$ sudo mysql_secure_installation
Then it will ask you to set up VALIDATE PASSWORD plugging or not. The importance of this plugging is it allows you to configure a strong password for database credentials. If you enabled it, it going to automatically check your password strength. Also, it will enforce the users to set out those passwords then much secure. It is enough to save leaving when plugging disabled.
when neglect other facts however strong and unique passwords are really good to use in database credentials. If you don’t want to enable this feature, you can press any of the keys to skip and go through the rest of the sets that we are provided.
Somehow your answer is going to be yes, then you will ask to select the level of password validation.
Securing the MySQL server deployment.

Connecting to MySQL using a blank password.

VALIDATE PASSWORD PLUGIN can be used to test passwords
and improve security. It checks the strength of password
and allows the users to set only those passwords which are
secure enough. Would you like to setup VALIDATE PASSWORD plugin?

Press y|Y for Yes, any other key for No y
There are three validation levels in this scenario. Those are low, medium, and strong. To select one of them this is the code for them.
- 0 for low
- 1 for medium
- 2 for strong
and then hit on Enter key.
There are three levels of password validation policy:

LOW Length >= 8
MEDIUM Length >= 8, numeric, mixed case, and special characters
STRONG Length >= 8, numeric, mixed case, special characters and dictionary file

Please enter 0 = LOW, 1 = MEDIUM and 2 = STRONG:
So now you can enter the password for MySQL administrator. This spot also having the password policies we mentioned above step. So if you didn’t enable the plugging, it just good to use a unique password here.
Please set the password for root here.

New password:

Re-enter new password:

Estimated strength of the password: 50
Do you wish to continue with the password provided?(Press y|Y for Yes, any other key for No) : y
You can see here the one above the line of the last line it says the strength of the password is 50. You gain it by entering your password twice. So it seems in our case 50. If you are ok with this result hit the key ‘Y’ to continue further. But if your result not going to satisfy you, you may need to press any other key to set up again the strongest password than before.
So with our case, we satisfy with that, hence we move forward. Then you can give the answer to the rest of the questions as ‘Y’. it will be going to remove anonymous users, as well as not give allow them to root user logging remotely and sweep up the database.
Remove anonymous users? (Press y|Y for Yes, any other key for No) : y
Success.

Normally, root should only be allowed to connect from
'localhost'. This ensures that someone cannot guess at
the root password from the network.

Disallow root login remotely? (Press y|Y for Yes, any other key for No) : y
Success.

By default, MySQL comes with a database named 'test' that
anyone can access. This is also intended only for testing,
and should be removed before moving into a production
environment.

Remove test database and access to it? (Press y|Y for Yes, any other key for No) : y
- Dropping test database...
Success.

- Removing privileges on test database...
Success.

Reloading the privilege tables will ensure that all changes
made so far will take effect immediately.

Reload privilege tables now? (Press y|Y for Yes, any other key for No) : y
Success.

All done!
Now you are all done with the settings of password for MySQL Admin.
Here’s our second sub-step on installing MySQL.
2.2. Change the Authentication method for MySQL root user.
Using the auth_socket plugging in MySQL 5. and newer versions on Ubuntu, MySQL root user is set its authentication by default.
Actually, this will result in enhancing the security, but the issue is this complicates things when you access your database server for any of the external programs. As an example, we can consider the phpMyAdmin.
To get rid of these issues you may need to change your authentication method as follow. Firstly you may need to change the auh_socket method to mysql_native_password. To start this flow of steps loving to your MySQL prompt using this command below.
$ sudo mysql
To find the current authentication method for all of the MySQL user accounts, run this command.
SELECT user,authentication_string,plugin,host FROM mysql.user;
if you are done successfully with this procedure you can see this sample output.
+------------------+-------------------------------------------+-----------------------+-----------+
| user | authentication_string | plugin | host |
+------------------+-------------------------------------------+-----------------------+-----------+
| root | | auth_socket | localhost |
| mysql.session | *THISISNOTAVALIDPASSWORDTHATCANBEUSEDHERE | mysql_native_password | localhost |
| mysql.sys | *THISISNOTAVALIDPASSWORDTHATCANBEUSEDHERE | mysql_native_password | localhost |
| debian-sys-maint | *F126737722832701DD3979741508F05FA71E5BA0 | mysql_native_password | localhost |
+------------------+-------------------------------------------+-----------------------+-----------+
4 rows in set (0.00 sec)

Here you can see our currently using the auth_socket plugging for our authentication.
Now we want to change the authentication to the mysql_native_password method. to do that you need to run the below command with replacing your strongest and unique password at the end. Another thing is to mention here is if you enable the VALIDATION plugging, certify that you used the strongest password upon the current policy requirements.
ALTER USER 'root'@'localhost' IDENTIFIED WITH mysql_native_password BY 'password';
You can update the changes done by you using the following command.
FLUSH PRIVILEGES;
You can confirm that your authentication method is correctly changed or not by using the following command.
SELECT user,authentication_string,plugin,host FROM mysql.user;
You can see this output then.

Now you can exit from the MySQL prompt.
exit
3.Install PHP
To installation of PHP run this command on your command prompt.
$ sudo apt install php libapache2-mod-php php-mysql
After installing PHP, you may need to create an info.php file in the apache root folder. As usual, this file may create in the apache folder as follow in the Debian-based Linux distribution.
- /var/www/html/
- /var/www/
But in Ubuntu 18.04 LTS it is in
- /var/www/html/
Let’s move into creating this info.php file in the apache root folder. to do this run the following command.
$ sudo vi /var/www/html/info.php
Additionally, you need to add these lines also.
<?php
phpinfo();
?>
Then you need to press the ESC key and type:wq. It makes the way to save and quit the file. Then you need to restart the apache service to get the effect of the changes. For that purpose use this command and run it.
$ sudo systemctl restart apache2
Now you are going to test the PHP as in the previous steps.
3.1. Test PHP
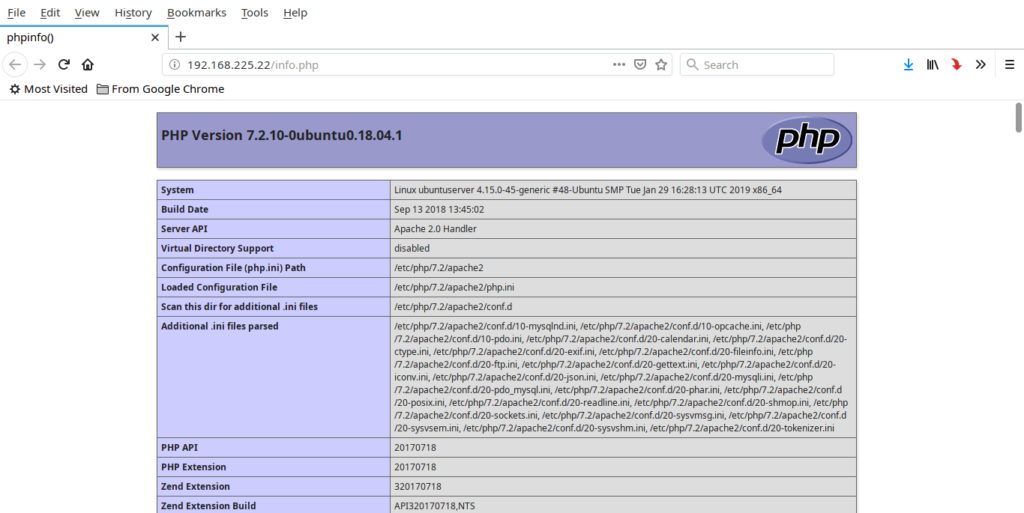
By navigating the URL which is http://IP-address/info.php, open up the test page of PHP in your web browser.

the usual thing is the situation where the user requests a directory from the web server as a first search, apache turns into looking for a file named index.html. So here if you want to change it to serve PHP files than the other ones, move index.php to the first position in the dir. conf file as follows.
$ sudo vi /etc/apache2/mods-enabled/dir.conf
You can see the content of the above-mentioned file as follow.
<IfModule mod_dir.c>
DirectoryIndex index.html index.cgi index.pl index.php index.xhtml index.htm
</IfModule>

# vim: syntax=apache ts=4 sw=4 sts=4 sr noet
Then you need to move to first the file named index.php. Once you are done with that, you can see the dir. conf file as follows.
<IfModule mod_dir.c>
DirectoryIndex index.php index.html index.cgi index.pl index.xhtml index.htm
</IfModule>

# vim: syntax=apache ts=4 sw=4 sts=4 sr noet
Then save and close the file by pressing the ESC key and typing: wp. To gain the effects of the changes restart the Apache service. To do that run the below command.
$ sudo systemctl restart apache2
3.2 Install PHP modules.
By installing some additional PHP modules, you can improve the functionality of PHP.
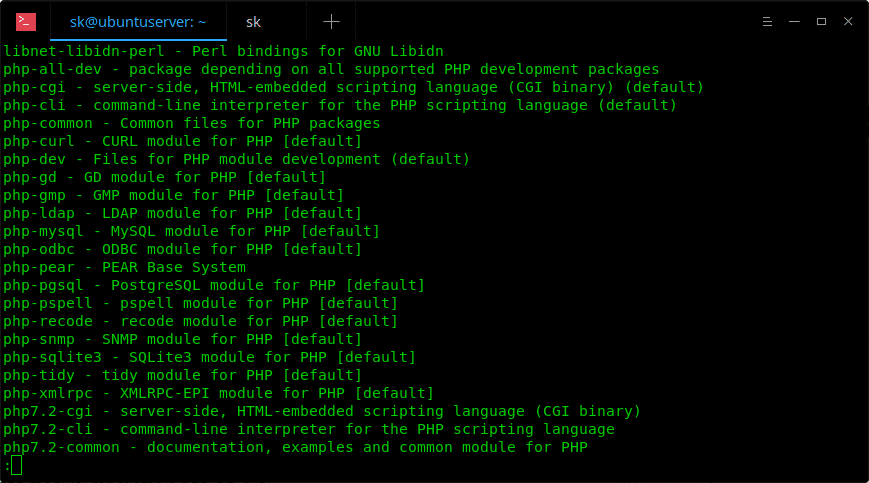
You can see the list of the available PHP modules by running this command in your command prompt.
$ sudo apt-cache search php- | less
Your output is like this:

Using the arrow key you can go through the result further. Then you can exit by pressing ‘q’ and ‘Enter’ key.
You can find any of the details of each PHP module. Consider this example of this ‘php-gd’ module.
$ sudo apt-cache show php-gd
To install a PHP module, use this command with the relevant module name.
$ sudo apt-cache show php-gd
To install all of the modules, you can run this.
$ sudo apt-get install php*
After running those commands be mindful to restart the apache service to gain the effect of the changes done by you.
To check the particular module is loaded or not, go to the info.php file and check whether it present or not.
It worth mentioning here you might want to install one o the data management system tool for managing your bunch of data easily through the web browser. If your selection is going to be your database as phpMyAdmin you can go through this article about how to install the phpMyAdmin ith LAMP Stack on Ubuntu 18.04 LTS.
Finally congratulations!!! you have successfully set up LAMP Stack with your Ubuntu 18.04 LTS server.
Read more:
How to use Let’s Encrypt to secure Apache on Ubuntu 20.04
Installing LAMP (Linux, Apache, MySQL, and PHP) on Ubuntu 20.04