No Audio or Sound is missing on Windows 10
What to do when you are experiencing issues like No Audio or Sound is missing in your Windows 10? Don’t worry. We are here to help you. We have several fixes for this issue. But before starting just check that you have plugged in all the cables correctly and not muted the speakers accidentally.

The reasons behind the no sound issue may be one of the following. So you have to check them one by one.
- The driver
- Your sound card
- Set the correct audio device as the default
- Disable enhancements
- Check the cables of the headphones and speakers are connected properly
- Run Sound and Audio Troubleshooter
- Check whether the HDMI cables are connected properly
- Run Sound and Audio Troubleshooter
1. Check your Driver
To set defaults normally you have to go to Control Panel > Sound > Playback and Recording tabs. Similarly, you can try this way. First, click Start and type Device Manager in the search bar of the start menu. Then press Enter.
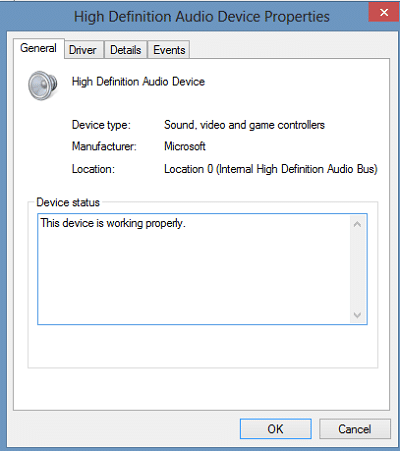
The Device Manager will open. In that, expand Sound, Video and Game Controllers. Find your audio device and double click it to open Properties. Then check if the driver is installed and the device is working properly.
Next in the Driver tab, click Update Driver and click OK. Or else you can uninstall the driver without deleting it by going to Device Manager > Action > Scan for hardware changes. So that the driver will be installed again.
2. Check your sound card
It’s very important to ensure that your sound card or sound processor is working properly. To do that type Device Manager in the search bar and then click Settings. Then open the Device Manager, double click on the Sound, Video and Game controllers to expand the category. If there is a sound card on the list you already have one. Often laptops and tablets don’t have sound cards. They have integrated sound processors and they also appear in the same category in Device Manager.
Then look at the Device Status. If the status indicates that the device is working properly, the issue is due to sound settings, the speakers, or the cables.
3. Set the correct audio device as default
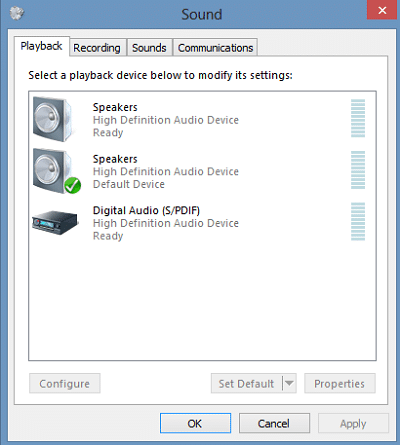
First, type Sound in the search bar and choose Settings and then Sound. Then in the Playback tab, you will see several audio devices as in the below image. The green check beside the device indicates the default one.  If a wrong device is listed as the default, you can select the correct device and then click the Set Default button. Finally, restart your computer.
4. Disable enhancements
To do this go to the Sound Control Panel which is on the Playback tab. Then right-click the Default Device and select Properties. After that choose to Disable all enhancements in the Enhancements tab. Now check whether you can play your audio device.

5. Check if the Speakers and Headphones cables are connected correctly
Nowadays, PCs have 3 or more jacks. They are,
- A microphone jack
- Line-in jack
- Line-out jack
As these jacks are connected to a sound processor, please make sure your speakers are plugged into the line out jack. But what to do when you are unsure which is the right jack? Let me answer. You can try plugging speakers in to each of the jacks and see it gives any sound.  Similarly, if you are using headphones do not plug the speakers into the line out jack of the sound card or PC.
6. Change audio format
Go to the Playback tab and then to the Sound Control Panel. Then right-click the Default Device and select Properties. Then go to the Advanced tab > Default Format > Change the setting. Once done check the audio device. If the error is gone you are good to go! But if not change the setting back to the previous state and move to the next solution.

7. Check whether the HDMI cables are connected properly
Imagine you are using an HDMI cable to connect your PC to a monitor with speakers that supports HDMI. There is a high possibility that you might not hear the sound. So you have to set the HDMI audio device as the default.
You can follow these steps to check if the sound is supported by HDMI:
- Type Sound in the search box.
- Then click Settings and select Sound.
- Under the Playback tab look for an HDMI device.
- Then set the device as the default and restart the PC.
If you don’t have an HDMI audio device your HDMI monitor should have an audio input. Therefore you have to connect a separate audio cable from the sound card directly to the monitor. If the monitor doesn’t have speakers, connect the audio signal to a different device like external PC speakers or home stereo system.

8. Run Sound and Audio Troubleshooter
You have tried all the above methods and still experiencing the issue, you can use the built-in Troubleshooting tool in Windows 10/8. This tool can automatically fix the audio recording problem.
This is how you gonna do that.
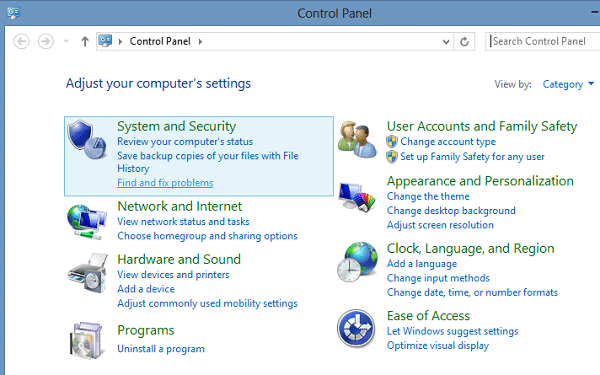
- Press Windows key + X together
- Select Control Panel
- Then select Find and fix problems under System and Security.

Another way is to open the Sound and Audio Troubleshooter is to right-click on the speaker icon in the Taskbar notification area and choose Troubleshoot sound problems.
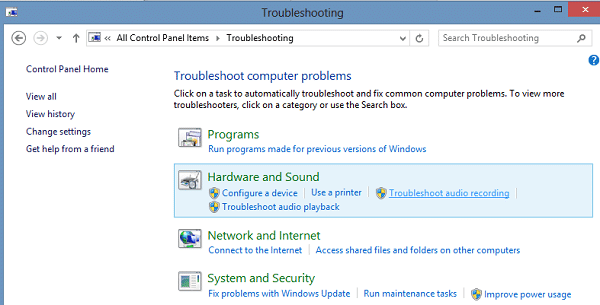
Then select Hardware and Sound and click Troubleshoot audio recording link.
That’s all for now. Hope we helped you to fix the issue. Even though we always mention Windows 8 and 10 in this article, you can try this with other Windows versions also.
