Remove or Uninstall a Printer Driver from Windows 10
As a Windows 10 user, if you have connected to different printers in several locations, you will not use all the printers installed on your device. And your device will end up with many printers installed on it without even knowing.  Fortunately, you can remove the printers you are not using anymore. But the printer driver will remain in your device. So there won’t be any problem if you need that printer again.
If you are so sure that you won’t be needing the printer again you can uninstall or remove old, obsolete, or uninstalled printer drivers and the remaining driver packages or registry entries from your device.
Today we are going to present you five ways to completely uninstall printer drivers in Windows 10.
How to Remove or Uninstall Printer Drivers in Windows 10
- Using Settings you can uninstall printer software
- Remove the printer driver from Print Server Properties
- Use the Control Panel to uninstall printer
- Use Print Management to remove old printers
- Delete old printers via Registry Editor
- Use Command Prompt to uninstall printer
- Remove a printer using PowerShell
- Delete the remainders from Windows driver store
1. Uninstall Printer Software using Settings
If you no longer need a certain printer you can uninstall that from Settings and then uninstall its software especially if you’re using a third-party utility. But if the Settings app has installed other tools to automatically manage the printer you have to remove the remaining software manually.
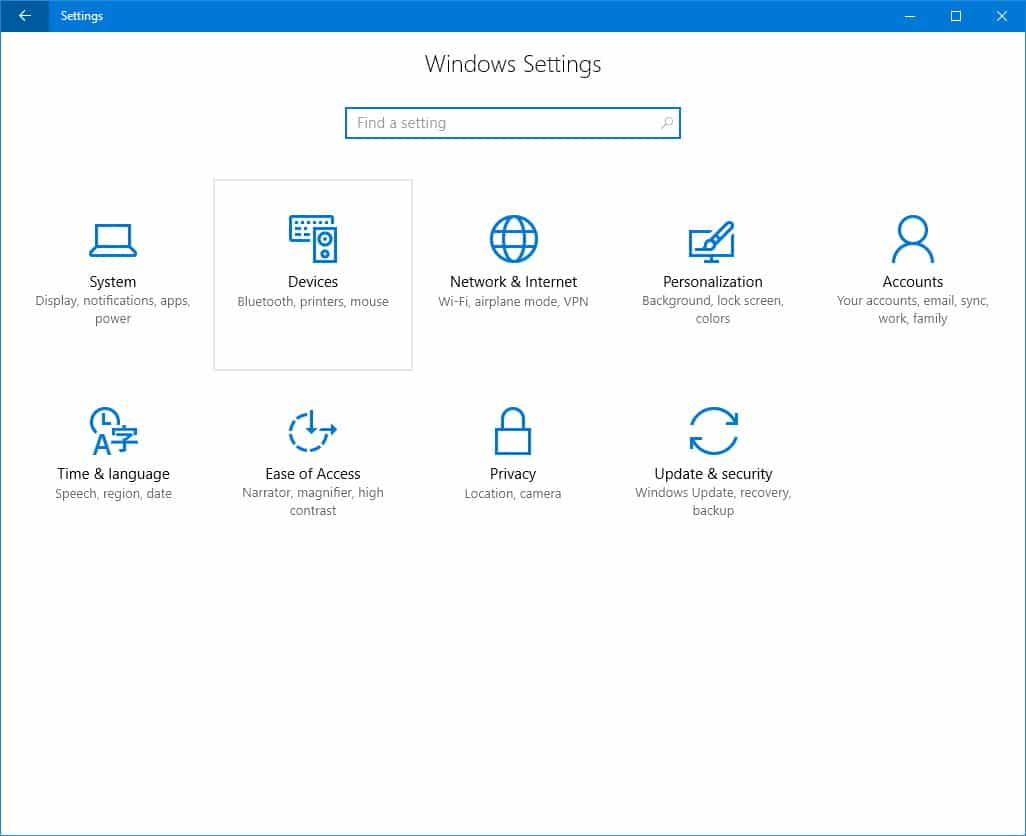
- First, open Settings > Devices

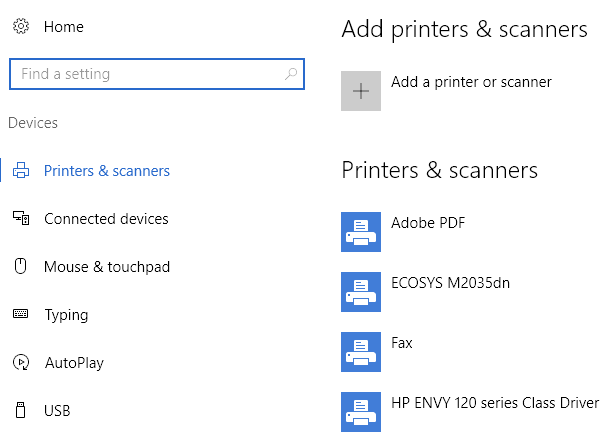
- Then click Printers & Scanners

- Select the printer you want to remove, click Remove Device and then click on Yes to confirm the deletion.

The above steps will only delete the printer from the list. To remove any remainders of the printer software or related applications you have to follow the steps given below.
- Open Settings > Apps

- Then click Apps & Features and then choose the printer software you want to remove.

- Finally, click Uninstall and follow the next steps as guided.
2. Remove Printer Driver from Print Server Properties
Even after following the above steps, still, you see the one that you removed on the Printers & Scanners page you can uninstall the printer driver and driver packages.
- First, open Settings>Devices>Printers and Scanners on the left pane
- Then navigate down to Related Settings and click Print Server Properties. Or else you can right-click Start>Run and type printui /s /t2 to enter the Print Server Properties page directly.

- After that select the Drivers tab. Select the old printer entry from the list and click on the Remove.

- Then you will see a pop-up window with two options. Remove driver only or Remove driver and driver package. Select the second one and click OK.

- Finally, click Delete in the confirmation prompt also.
3. Uninstall Printer Driver using Control Panel
Just follow my lead!
- The first step is to open Control Panel>Hardware and Sound

- Then click Devices and Printers

- Right-click on the device that you want to remove and click Remove device. And click Yes to confirm.

- Now, go to Settings>Apps>Apps & Features and choose the software you want to get rid of.
- Then click Uninstall and follow the on-screen steps to permanently remove the printer software.
4. Use Print Management to Remove old printers
Another method to remove printers and their drivers is via the Print Management console.
In the Print Management dialog, you will see the printers and current print jobs on your device. So we advise you to check that the printer driver you are going to remove is not being used by any other printer. Once that is done, you can proceed with the below steps.
- Open Control Panel>System and Security

- Then click Administrative Tools

- Double click the Printer Management shortcut

- Select All Printers under Custom Filters
- Then right-click on the Printer you want to remove

- And click Delete and Yes to confirm the deletion.

- Again Open Settings>Apps>Apps & Features and click the printer software you want to delete.
- Then click Uninstall. Follow the on-screen instructions to complete the uninstallation.
5. Delete old printers via Registry Editor
You can open Add a printer page and edit the registry to remove the old printers. First, you have to create a system restore point and then you can follow these steps.
- First right-click Start>Run
- Then type regedit.exe and then click OK to open the registry editor.
 Find the registry key:
HKEY_CURRENT_USER\SOFTWARE\Classes\Local Settings\Printers\Roamed 
- Right-click the printer from the right pane and click on Delete.
Then you can delete unwanted items by going to this key:HKEY_CURRENT_USER\Printers\Connections

- Now, go to this key:
HKEY_LOCAL_MACHINE\SYSTEM\CurrentControlSet\Control\Print\Printers
- Now, go to this key:

- Then click to expand the key and right-click on the printer you want to remove and click Delete.

- As some subkeys may still have references to your old printer you can delete the following too:
HKEY_LOCAL_MACHINE\SYSTEM\CurrentControlSet\Control\Print\Environments\Windows NT x86\Drivers\Version-3 HKEY_LOCAL_MACHINE\SYSTEM\CurrentControlSet\Control\Print\Environments\Windows x64\Drivers\Version-3 HKEY_LOCAL_MACHINE\SYSTEM\CurrentControlSet\Control\Print\Environments\Windows x64\Drivers\Version-4 - Then exit the registry editor.
6. Uninstall Printer using Command Prompt
If you are a command-line expert, you can delete a printer and remove related drivers and apps using the Command Prompt also.
- First click Start and type CMD in the search bar.
- Then click Command Prompt and choose Run as administrator from the right pane.

- Then type the command: wmic printer get name in the Command Prompt Window.
- Press Enter.

- You will see the list of printers on your device.
- Type printui.exe /dl /n “YOUR-PRINTER-NAME” to uninstall the printer. Do not forget to replace YOUR-PRINTER-NAME with your printer’s full name. For example, printui.exe /dl /n HP DJ 2600 Series CL3.

- Then press Enter to uninstall the printer.
- In order to uninstall the printer software, open Settings>Apps>Apps & Features and select the printer software you want to remove.
- Click Uninstall and follow the on-screen instructions.
7. Remove a Printer using PowerShell
If you are not comfortable with Command Prompt you can try PowerShell with the following steps.
- First Right-click Start> Windows PowerShell (Admin)

- Then type this command: Remove-Printer –Name “YOUR-PRINTER-NAME”

- Open Settings>Apps>Apps & Features and just click the software you want to remove
- After that click Uninstall and follow the steps accordingly to remove it completely
8. Delete Remnants from the Windows Driver Store
This is used to remove any remainders of drivers that still be there on your device even after the deletion.
In the Windows Driver Store, you will see inbox and third-party driver packages that are installed and stored even before the Driver installation. Every subfolder in the store has a driver package and corresponding .inf file. But it is not easy to find the exact driver package you want to remove.
Fortunately, you can use a third-party tool to explore Windows Driver Store and permanently remove the old printer driver. That will save a lot of space also.
What will happen when the Drivers are deleted?
Let’s start with the basics. A device driver is a software that instructs the operating system of your computer how to communicate with the connected device.
I’ll give you an example. If you want to perform a print job, the printer driver will fill the gap between the printer and your computer. So the print command will be executed.
Your printer won’t work without the printer driver. So once you delete the driver the printer will become just a piece of hardware.
But there is a way to undo the deletion using System Restore.
Similarly, Windows can automatically install the driver on your operating system also. If the computer can’t find a suitable one it will search for a driver online via Windows Update. Or else you can visit the device manufacturer’s website to find the driver that is compatible with your printer.


 Find the registry key:


