Let’s think that you’re going to disconnect a connected device from your Windows PC. Then you’ll see an appearance of icon named “Safely Remove Hardware and Eject Media” on the notification panel of Windows.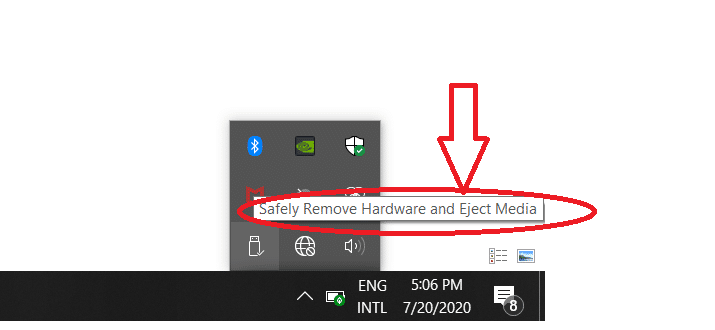 You may ignore it thinking that it is not important. But it is really important. According to Windows, you should use that icon for the safe removal of the connected device from your PC. Usually, this connected device is a USB pen drive. You have to click on the option “Safely Remove Hardware and Eject Media”. Then you ‘ll get a notification saying that the relevant device can now be removed from your computer.
![]()
In the process of disconnecting any connected device from your computer, first of all, Windows must be made ready to face the adjustment of features. So in order to support Windows for that process, you have to follow this rule. In doing so Windows get ready to lose its grip on that connected device by restoring any data on the device.
Most people say that it is a useless thing to do so and ignore this point. Let’s think that, you may disconnect a device without using that safe removal option of Windows. Then it’ll be put your computer in danger. Because it will lead to the corruption of data while damaging files of your computer.
There are some occasions the “Eject” window may not show even though you click on the icon “Eject media”.And also there will be a failure even though you try to remove that device through opening “Devices and Printers” in the control panel too. So I’ll tell you what to do on such occasions. There are few options to select to solve that. It may differ according to your issue on your PC. One of them may work for you. Let’s see it then.
First Option
In Windows 10, you can follow these steps to disable the “Safely Remove Hardware and Eject Media” because it may in the hidden section of the notification panel of the desktop screen.
- Select the “Taskbar setting” option by right-clicking on the Taskbar section. Then you’ll get to see Taskbar setting panel.

- After that choose the option named “Select which icon appears on the taskbar” under the notification section. Then a drop-down list of icons of the taskbar will appear.

- When you going down the list, you can see the “Window Explorer Safely Removal Hardware and Eject Media ” option. Click the ON button in front of that option.

After this process, check whether the Safely Removal Hardware icon appears on the taskbar section.
Second Option
If the above steps are not working for you. It may due to a malfunction. If that the issue you have to restart the Windows Explorer. It is the only solution. For that, you have to follow these steps,
- First, choose the “Task Manager ” option by right-clicking on the Taskbar. Then you’ll get a list of Background processes that active at that moment in your PC.

- Next select “Windows Explorer”.
- Then click on the “restart” option.

Make sure to save everything before you restart your PC. After following all the above steps, check if the “Safely Remove Hardware” icon is shown on the Taskbar.
Third Option
Anyway, there is another solution for you to disconnect hardware without damaging your computer data. That is using free third party software.you can see so many such third party Softwares in the global market such as USB Disk Ejector, Hotswap, etc. There’s no need much storage space for them in your PC. Sometimes you can use them without installing it on your PC. You just have to double click and launch it. So that it will track all the connected devices to your PC and let you disconnect them safely according to your wish.
Fourth Option
Furthermore, there’s another method available for you to try. You can use the “Plug and Play setting”.Because that is the one held responsible for running the “Safely Remove Hardware” matter. There are cases that happened to be stopped working.
- Click “Windows” + “R” so that you can see the “Run” prompt.

- Secondly, type services.msc in the text box that appears on the “Run” prompt and press the “Ok” button. Then you can see a drop-down list of services.

- Search and select the “Plug and Play” option and then double click on it. After that, it will launch.

Now check if the “Safely Remove Hardware” icon is shown in the taskbar.
Fifth Option
Anyway, it is not essential to use this “Safely Remove Hardware “icon always in the process of disconnecting a USB driver or any other device. Although it happened to be enabled by default if you need you can disable it at any time. Let’s think there is a situation you disconnect the USB drive while it in use and you connect it again to the same computer. At that time you can see the appearance of the Scan and Fix option on your desktop screen. In order to do this follow the steps given below,
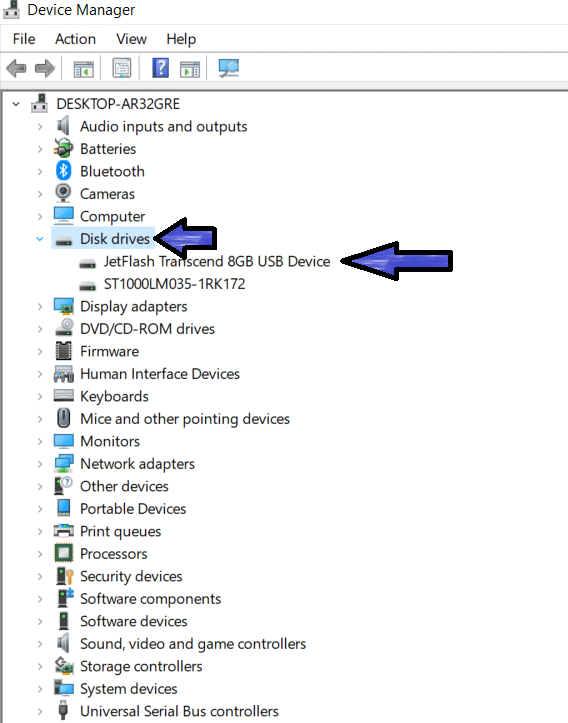
- Go to the control panel and select the “Device Manager” option.

- You can select your pen drive by clicking on the disk drive option.
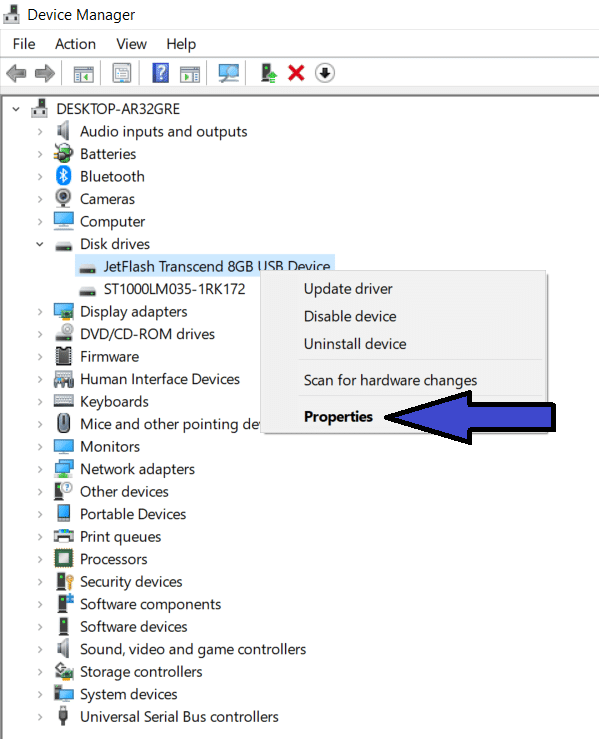
- Then right-click on it and select “Properties” option.

- In this ”properties” panel ,select “Quick Removal” option under” Policies” status .and then press ”Ok” button.

If this “Quick Removal ” option is already chosen, that is the reason for the invisibility or the hiddenness of the “Safely Remove Hardware” icon. Let’s think you need to see it again, then select the “Best Performance” option instead of the “Quick Removal” option and press the “Ok” button.
Sixth Option
If still this “Safely Remove Hardware” icon is not visible on your taskbar, don’t worry there’s another solution.but it might be somewhat complex for you. Let’s end up this manual procedure and disconnect the connected hardware from your PC.In order to do this,
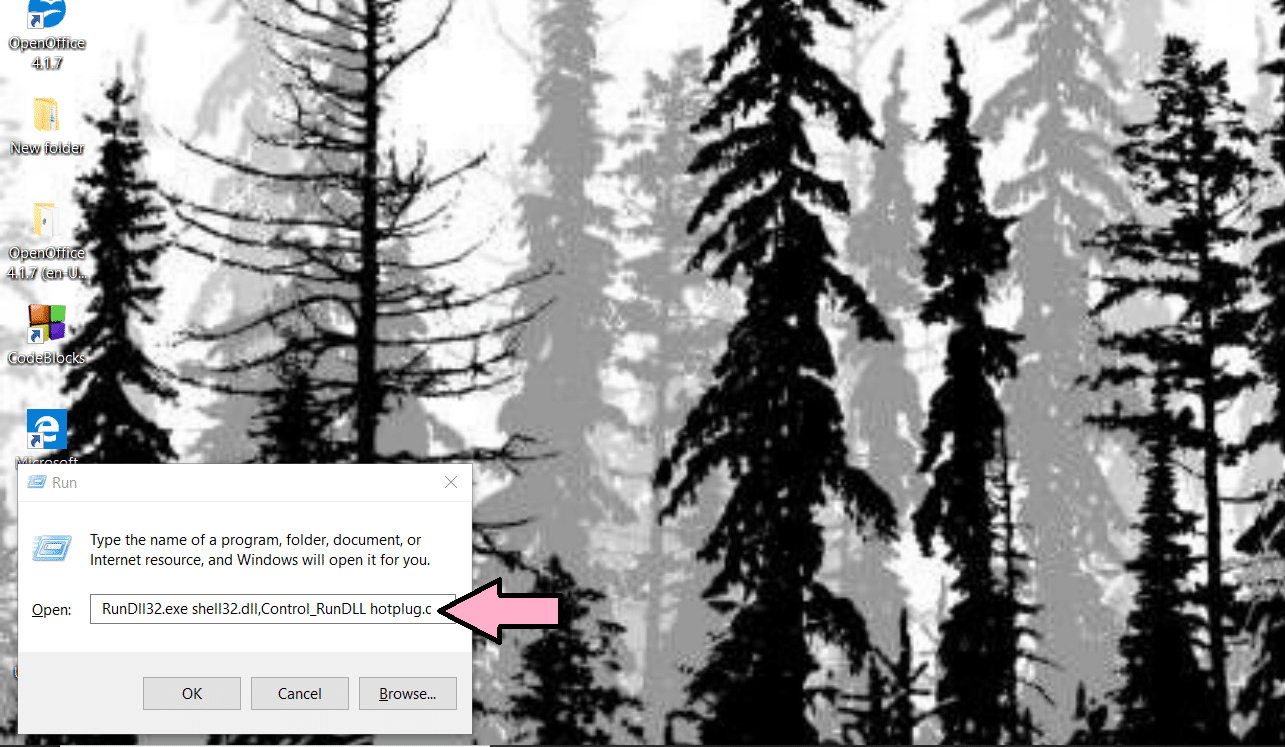
- First of all, you have to click “Windows”+”R”.Then “Run” prompt will appear. Then type the command “RunDll32.exe shell32.dll, Control_RunDLL hotplug.dll” on the given text box. and click the “Ok” button.

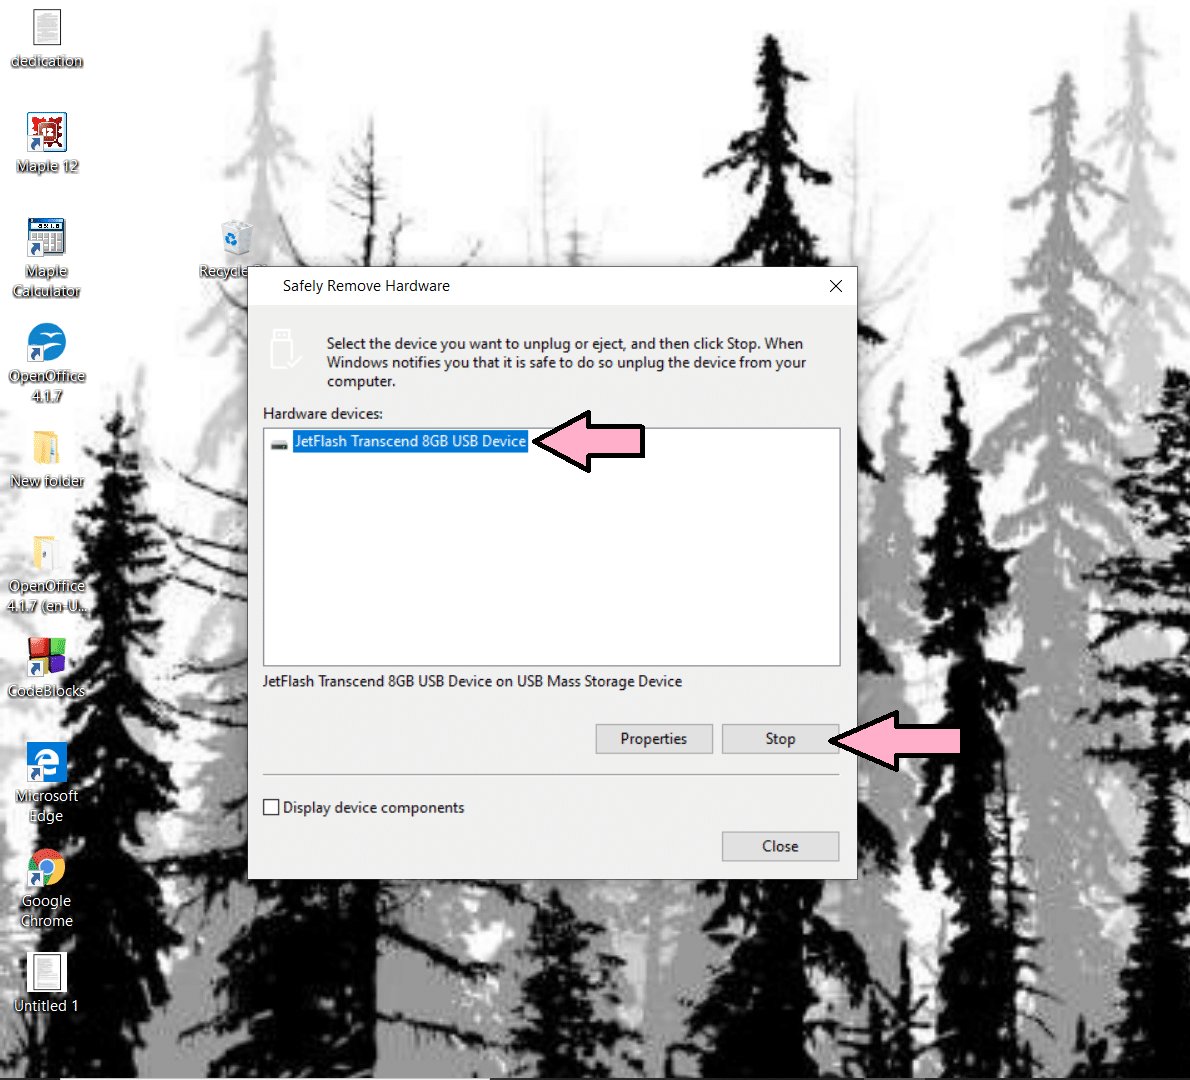
- Then you’ll see the “Safely Remove Hardware” prompt. Select your relevant USB drive and press the “Stop” button and then disconnect it.

Usually, we have to use this “Safely Remove Hardware” icon whenever we try to disconnect a device from our PC.So your easiness we can make a shortcut for it on your desktop. For that let’s follow the steps given below,
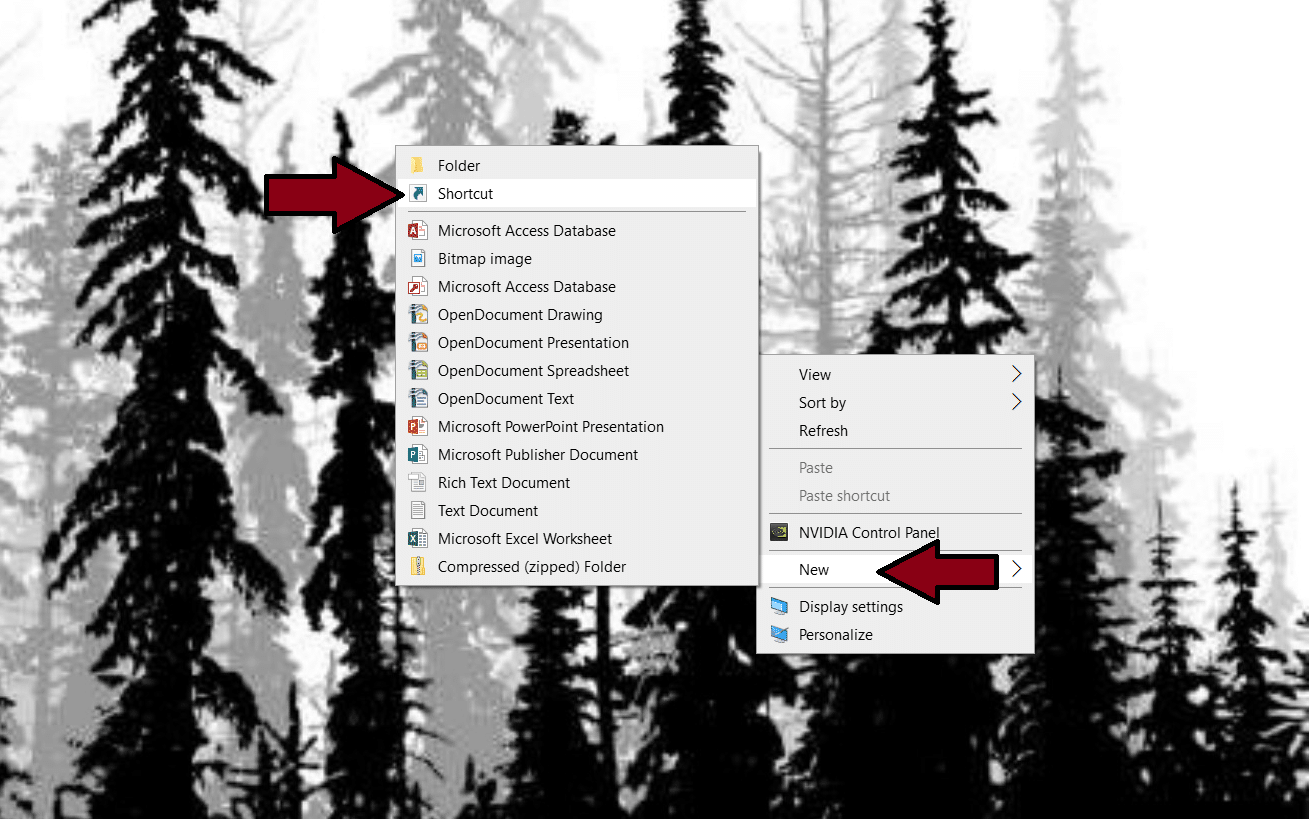
- Right-click on your desktop and then select “New”.After that select ”shortcut ”option.Then the “Create Shortcut ” prompt will appear on your desktop screen.

- Type the command “RunDll32.exe shell32.dll, Control_RunDLL hotplug.dll” on the text box and press the “Next” button.

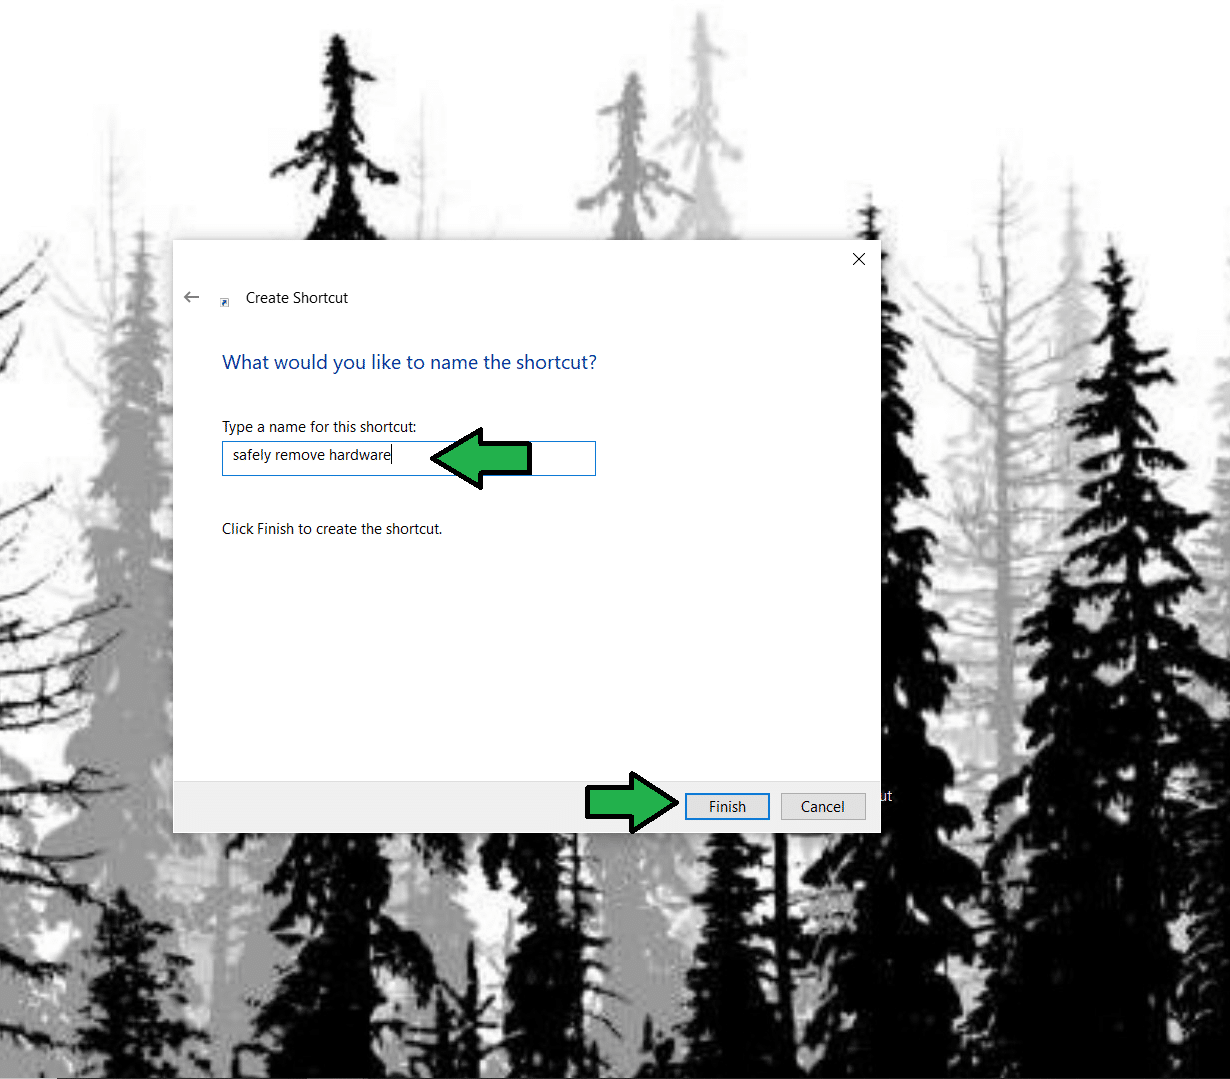
- Then name your shortcut by typing “Safely Remove Hardware” in the given text box and select “Finish”.

Seventh Option
At the moment you plug in a pen drive for your new PC. Windows take action to install the device driver. So you maybe didn’t take action to update it. If not there may be corruption in that device driver.If that the problem let’s follow these steps to update it,
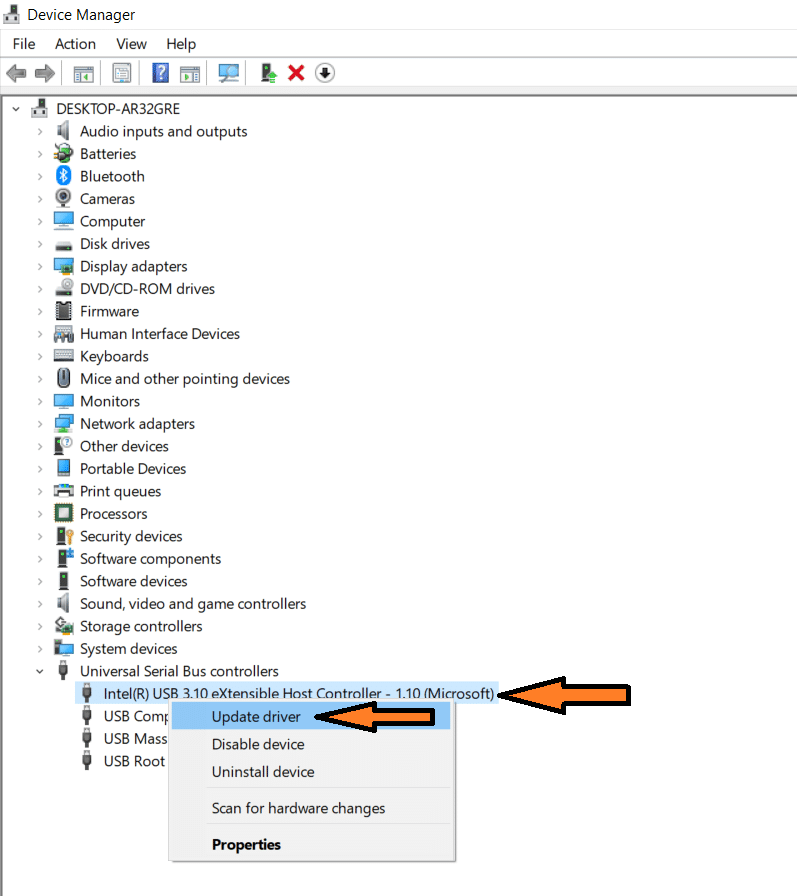
- Go to the control panel and select “Device Manager”.

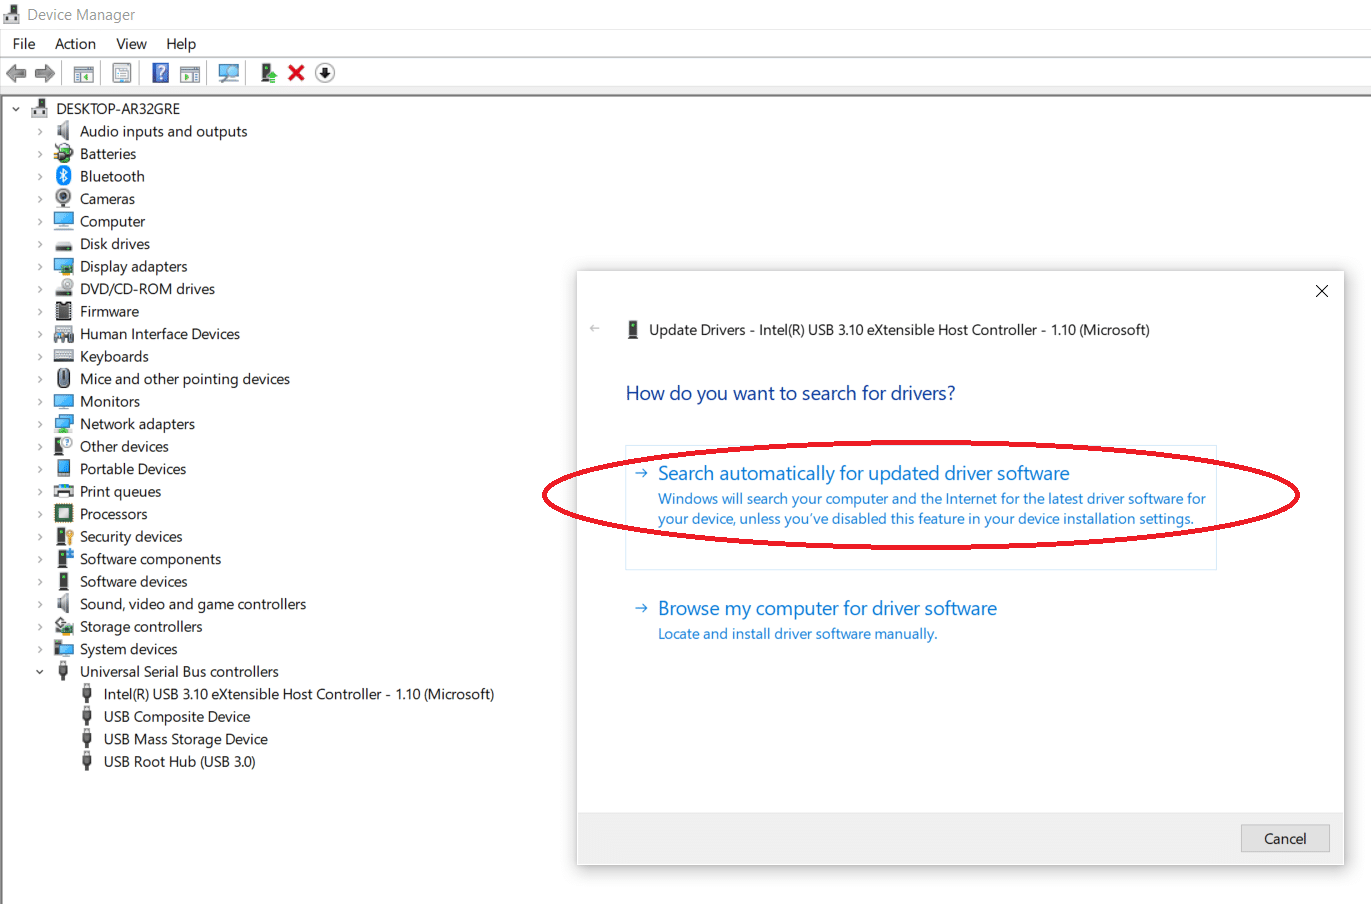
- Select “Universal Serial Bus Controllers” and then select USB Drive and choose the “update driver” and it will offer you an option “Search automatically for updated driver”.

Still, If you don’t get any solution again follow the above first two-step and select “Uninstall device” instead of “Update Driver”.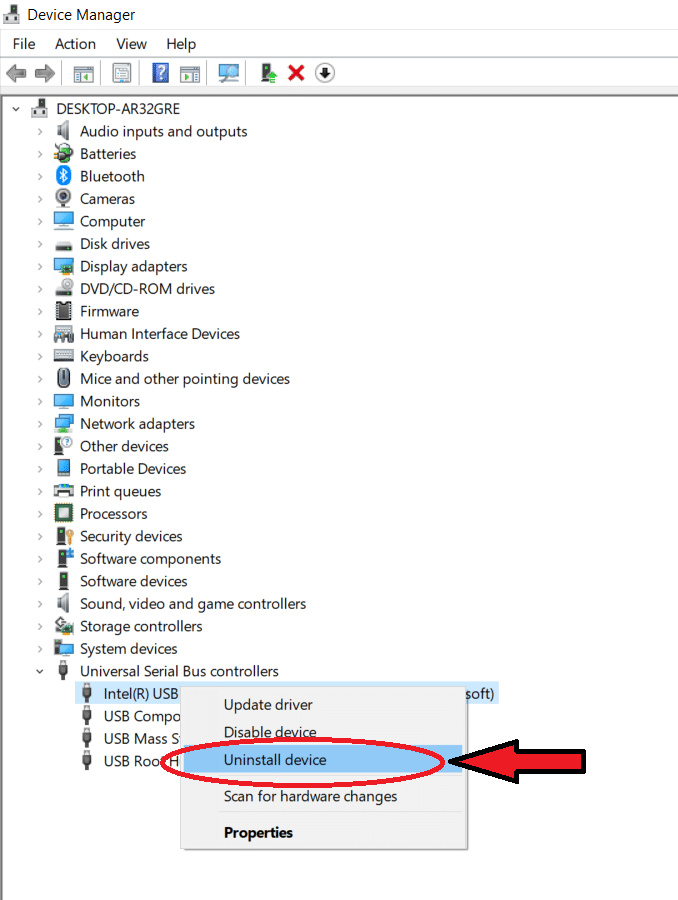 And again go to “Device Manager” and click on the “Action” status and select “Scan for hardware changes”.
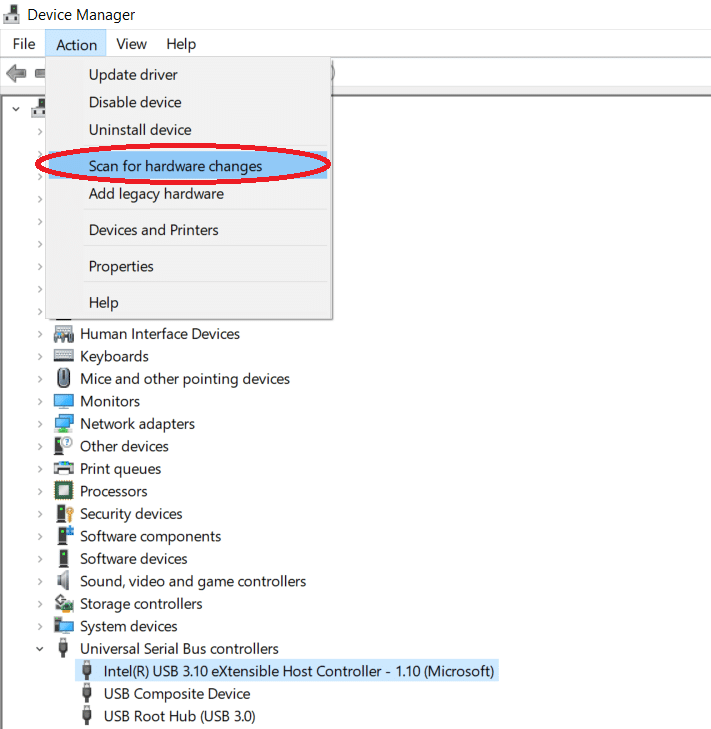
It’ll track all the unidentified drivers and reinstall them. Now once again check whether the “Safely Remove Hardware” icon is available in the Taskbar section on your desktop screen.
You better follow this “Safely Remove Hardware” option. Because it won’t kill you to spend a little time to follow this step. It’ll be a good thing for both you and your PC.


