Today I came to you with another android help article in the root series. It is about how to extract the boot.img file directly from your device without downloading the firmware. As you already know, to gain complete access to your android, you have to unlock the bootloader first. Then you can customize your android device as you wish. But beforehand you will need to get the administrative privileges or you need to root the device using Magisk.
Rooting can be done in two ways. Either by directly flashing the Magisk app via TWRP or extracting the boot.img file from stock firmware and then proceed with patching and flashing. But the latter method has some problems. You will need to download the whole firmware which is a time-consuming process. And a waste of data.
Similarly, you should get the exact same firmware version that is already installed on your android device. You will end up in a boot loop or with a bricked device if you used the wrong version. So, what about getting the same result without using stock firmware? Even though it sounds strange, it is 100% possible.
What we gonna do is directly extract the boot.img file from the firmware (which is already installed on your android device) without downloading the file. Now, let’s get into the tutorial.
Extract Boot.img Directly from Device without Downloading Firmware
To facilitate clarity the instructions are given in separate sections. I advise you to follow the exact steps in the exact order to avoid consequences. And please keep in mind that we don’t hold the responsibility if anything happens to your phone.
Install Android SDK to Extract Boot.img Directly from Device without Downloading Firmware

Firstly you need to install the Android SDK Platform Tools on your PC. It is the recommended official ADB and Fastboot Binary provided by Google. Just download and extract it to any convenient location on your PC. Once it is completed you will have the platform-tools folder. We will be using that particular folder throughout this tutorial.
Enable USB Debugging
The second step is to enable USB Debugging. So that the device will be recognizable by the PC. You enable USB Debugging by navigating like this. Read More: Enable USB Debugging and OEM Unlocking
Settings > About Phone > Tap on Build Number 7times > Again to Settings > System > Advanced > Developer Options > Enable USB Debugging and OEM Unlocking
Install TWRP Recovery
Installing TWRP recovery is mandatory for the process. You can read our guide on how to install TWRP recovery on Android to get the instructions.
Boot Device to TWRP Recovery
- As the first step connect your phone to the PC using a USB cable. Confirm whether USB Debugging is enabled.
- Go to the platform tools folder.
- Type CMD in the address bar and press Enter. So that the command prompt will be launched.
adb reboot recovery- Then type this command in the CMD window to boot your device to TWRP recovery.
Extract Boot.img via TWRP
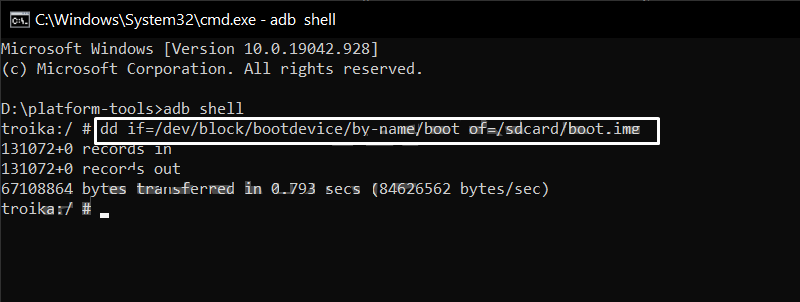
- Now you have to execute the following command in the CMD window which is opened within the platform-tools folder.
dd if=/dev/block/bootdevice/by-name/boot of=/sdcard/boot.img
- Then the device will extract the stock boot.img file from the already installed firmware. And the boot.img file will be placed in the Internal Storage.
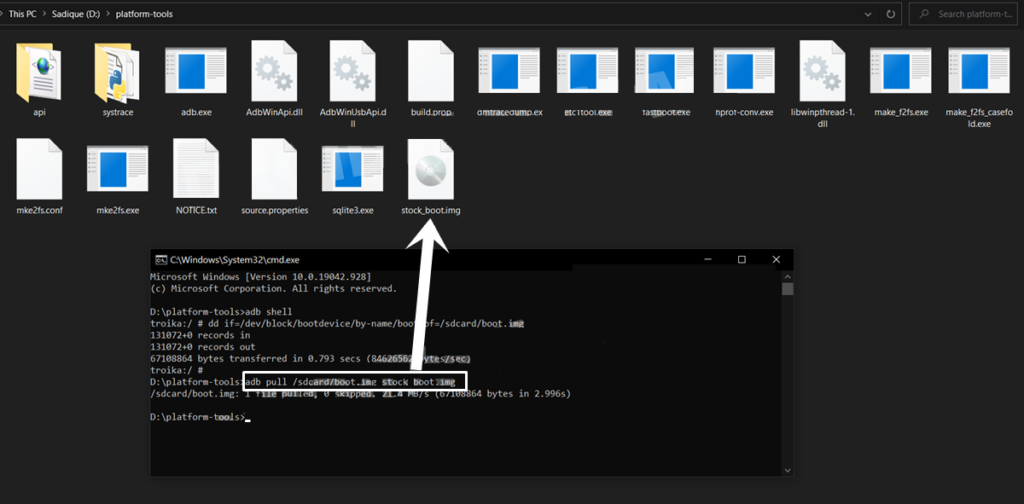
- You can create a backup of this file using the below command.
adb pull /sdcard/boot.img stock_boot.img

- So that a copy of boot.img will be kept in the platform-tools folder which is named as stock_boot.img.
- Finally you can reboot the device to the OS by navigating to Reboot > System.
Now you can install the Magisk app and patch this boot.img file. So that you will get the magisk_patched.img file. Then you can root the device!!
Extract Boot.img via a Script File
If you are not comfortable with manually executing commands and stuff, there is another way. An XDA Member created a script file to do the same thing. The only thing you have to do is to launch the file and wait! Download : Script from GitHub: OP7T-boot-patch-tool
You can verify the file by entering its code at GitHub. Especially if you are not sure about it. Or else you can edit the batch file using an advanced text editor and again verify the file contents as given in the above picture. The prerequisites are the same as before.
Do you think this is helpful? If so, please share this article on Facebook, LinkedIn, etc. And we warmly welcome your queries, comments, and suggestions. Feel free to contact us.
You can join our community and open help Topic under Android.
It’s totally free! And, please don’t forget to like our Facebook page. Thank you very much! Have a nice day! 😊