How to Extract payload.bin and get the stock boot image file
Howdy! I am here again. Brought you another article, and the title says how to extract payload.bin and get stock boot image file and other firmware files on your android device.
Previously the OEMs provided all the stock firmware files in a single zip file. You just had to extract that stock firmware to get the necessary files. Some OEMs still provide this. But some like OnePlus won’t. That is why you need help. And I am here for you.
In such instances, the stock firmware files are bundled in the payload.bin file. And this cannot be extracted via WinZip or WinRAR etc. You will need a set of applications in the form of the Payload Dumper Tool and Python. Once you have the apps the only thing you have to do is follow the tutorial.
However, before moving into the guide, let’s discuss why you need to extract the payload.bin to get the stock boot.img file. You will see a detailed explanation in the following paragraph.
Why you need to Extract payload.bin using the PC
Let me give a brief explanation about Payload.bin. It contains three partition files; system.img, boot.img, and vendor.img. If you are changing from GSI to stock ROM, you will need the system.img file to flash the system. Similarly, the vendor image includes device-specific hardware drivers.
But the most interesting thing is the boot.img file. It is essential to root your device. As you already know rooting your device lets you gain administrative-level privileges. And there are two methods that you can use to root. With the help of TWRP and without TWRP. However, the most popular method among the users is rooting the device without TWRP. The reason is, a working TWRP recovery is unavailable for a majority of Android devices. And you need a stock boot.img file to root your device without TWRP recovery. Then only you will be able to patch the image file using Magisk and then flash it using fastboot commands.
As OEM now contains all the files including the boot.img, you must extract the payload.bin file. And the most suitable way to do that is via Payload Dumper Tool and Python. And you can read the following tutorial for the detailed instructions.
How to Extract payload.bin File
Before proceeding with the steps to extract the payload.bin file, there are some prerequisites you have to fulfill.
Prerequisites
- The first prerequisite is the payload.bin file. You can get this from the stock firmware for your phone. Most of the OEMs upload them on their official page like OnePlus Download and Update page or Google Factory Image page. You can download the firmware from those pages and extract using WinZip, WinRAR or 7ZIP to get the payload.bin file.
- As the second prerequisite, you will need a Payload Dumper Tool to extract the payload.bin file. You can use this link to download the tool.
- And the last prerequisite is to install Python onyour PC. This is the link. And you need to install the latest version.
Once you have fulfilled all the prerequisites, now you can proceed with the instructions.
Step 1
Install Python on your PC
- Firstly launch the Python EXE setup file. Then you will be directly prompted for the installation. You can click either Install Now or Customize Installation. Install Now is the default option and its easier to follow. By selecting Customize Installation you can change the directory.

- Regardless the method you choose to install, don’t forget to keep a note about thw method. You will need that in a while.
- And once the installation process is completed tap on the Close button.

Step 2
Install Payload Dumper file
As you already completed installing Python, you can move on with extracting the Payload.bin file and getting the stock boot.img file. For that, you will need the Payload Dumper Tool. Here are the steps to install the tool.
- Firstly extract the contents of the Dumper Tool. That will be located in the folder where you extracted Python.
- If you selected default directory when installing Python, the contents should be extracted within:
C:\Users\USER-NAME\AppData\Local\Programs\Python\Python <version number>Step 3
Extract Payload.Bin
- The next step is to copy the payload.bin file from the ROM and move to the folder where you installed Python. That means the directory will now contain the Payload Dumper Tool, the payload.bin file and the Python software.
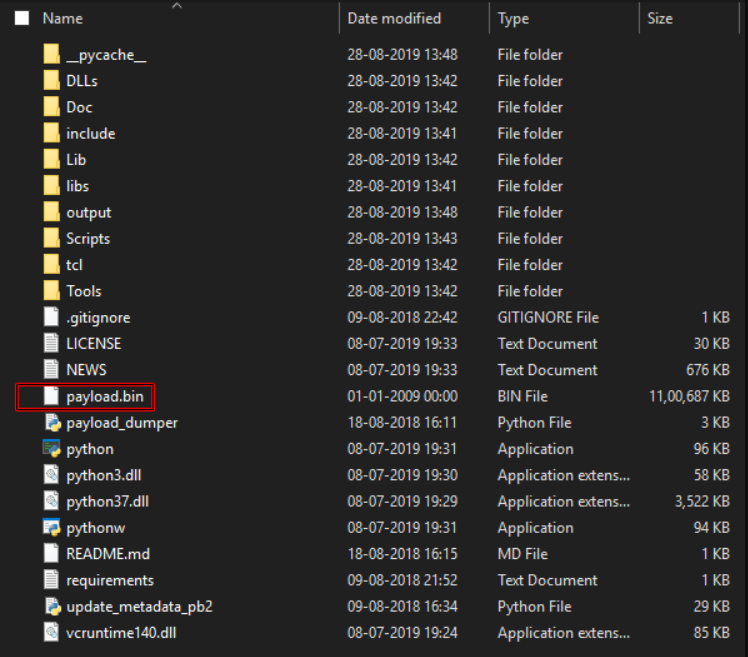
- Now you have to type CMD in the address bar of the same folder and press Enter. Then the command prompt will be launched.
- As the next step, type the following command to install the required dependencies.
python -m pip install -r requirements.txt
- Now you need to execute this command to extract all the contents of payload.bin file. Remember it will take some time according to the size of the package.
python payload_dumper.py payload.bin- Usually the file will give you three files. The boot, system and vendor files. But in some instances you might get dtbo, and a few files as well. Don’t worry. That is not an issue. I will help you with it.

Once the process is completed the extracted files will be saved in a folder named Output. The output folder will be in the following location if you extracted Python in the default directory.
C:\Users\USER-NAME\AppData\Local\Programs\Python\Python<version-number>/Output

I have concluded the steps to extract the payload.bin file and get the stock boot.img file with the help of a PC. Now I will guide you to do the same thing without using the PC.
Extract Payload.bin Directly on Android without PC
Here are the steps. Please make sure to follow the steps exactly without skipping a single step.
Step 1
Setup Payload Dumper Tool
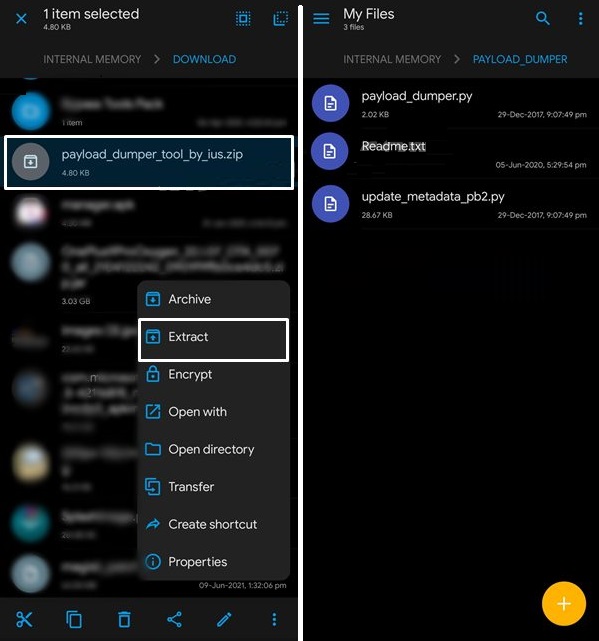
- Firstly download the Payload Dumper Tool to your phone.
- Extract the tool to the root of the Internal Storage. But not inside a folder.
Step 2
Get the Payload.Bin File
- Firstly download the ROM/firmware and extract the payload.bin from it. If it is a OnePlus firmware the file name will be .zip.jar extension.
- Now you have rename the file by removing the JAR at the end. So the file name will be ended with .zip.
- Then extract the ZIP firmware to get the payload.bin file.
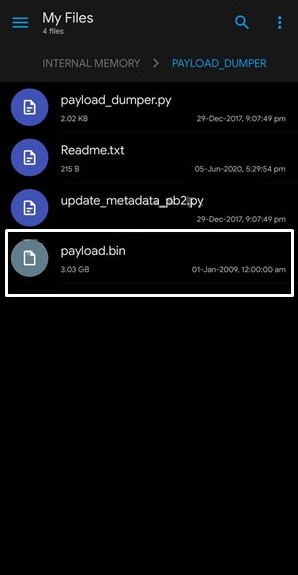
- Once you have the payload.bin file, just transfer the file to the same folder where you extracted the Payload Dumper Tool.
Step 3
Setup Python on Android
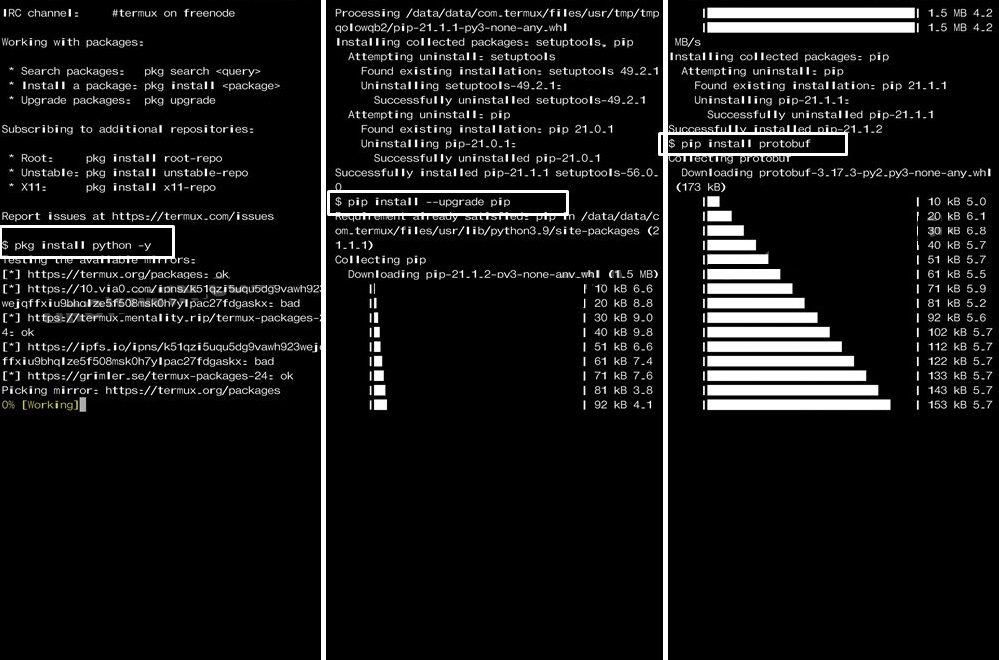
- Now you need to download and install the Termux App on your android device.
- After completing that, launch the app and execute the following commands. Type a command, press enter and then type the next one and repeat.
- While executing the codes it might ask you to install additional dependencies, just type Y and press Enter.
pkg install python -y
pip install --upgrade pip
pip install protobuf
apt update && apt upgrade -y
Step 4
Grant Storage Permission
Next, you should grant the storage permission to Termux using the below command.
termux-setup-storageThere might be a warning message from Termux like this. “storage partition is going to be wiped but no storage contents will be touched”. Again type Y and press Enter. And don’t worry a bit about losing data. I can assure you from my experience.
Step 5
Change Termux Directory to Payload.bin File
The next step is to change the Termux’s directory to the folder where you placed the payload.bin file. It is the folder you got after extracting the Payload Dumper Tool. In this example, the location is Internal Storage > payload_dumper folder.
Here’s the command you need to execute:
cd storage/shared/payload_dumperStep 6
Extract payload.bin on Android
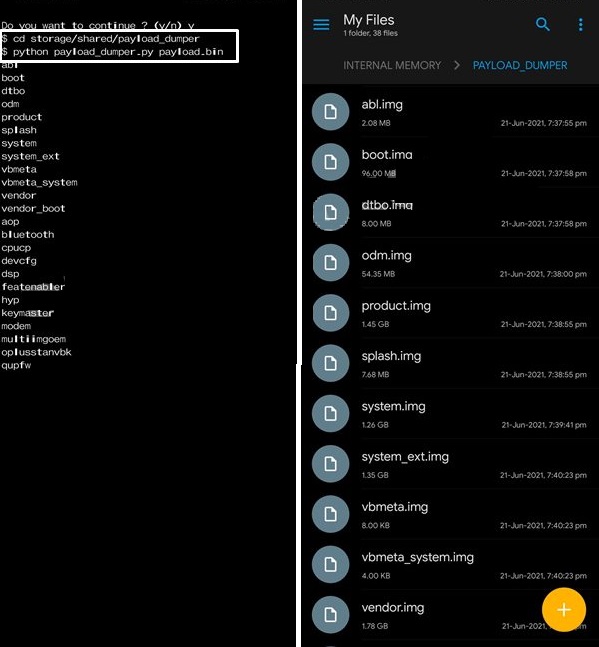
As the last step, you need to execute the following command to extract the payload.bin file straight on your android device without using the PC.
python payload_dumper.py payload.binDo you think this article on How to Extract payload.bin and get the stock boot image file is helpful? If so, please share this article on Facebook, LinkedIn, etc. And we warmly welcome your queries, comments, and suggestions. Feel free to contact us.
You can join our community and open help Topic under Android.
It’s totally free! And, please don’t forget to like our Facebook page. Thank you very much! Have a nice day! 😊