Extract boot.img from boot.img.lz4 and Root Samsung
Hello buddies! How are you? Hope you all are safe and happy during this pandemic. Today I came to see you with another article in the extracting series. It is about how to extract the boot.img.Iz4 file and get the boot.img file to root your Samsung device.
As you already know, rooting gives you administrative privileges. In other words, you will get to enter the system partition. So, you will be able to flash Magisk modules, Xposed framework, and various themes. However, you need an unlocked bootloader to perform these tasks.
There are some consequences of unlocking the bootloader. The device’s warranty will become null and void. And there might be issues with Samsung Pay, Secure Folder, Google Play, Netflix, and Pokemon Go. That’s why you need to know all these before attempting a root. And once you come to a conclusion to root the device, you can continue reading this guide to extract the boot.img from the boot.img.Iz4 file. Read: Extract Boot.img Directly from Device without Downloading Firmware
Why use the boot.img.Iz4 extracted from boot.img to Root Samsung
Here is a brief summary of how to root a Samsung device. Firstly you need to download the stock firmware file using the Frija Tool or from SamMobile. And extract the firmware to get five files in .tar.md5 format. The five files are AP, BL, CP, CSC, and Home CSC. Then you will take the AP file and patch it using Magisk. So that you will get the magisk_patched.tar file.
Thereafter the patched AP file (magisk_patched.tar) will be flashed using Odin to the AP slot. Simultaneously you need to untick the Auto Reboot option. As the next step, you will use hardware keys to manually reboot the device to the rooted OS. That’s all! Now, you have a rooted Samsung device. But some users have reported that their device ends up in a boot loop after flashing the magisk_patched.tar file to the device using Odin’s AP slot. Another complaint was Magisk still showed not installed after completing the process. And the device is still not rooted. I did a little bit of research about these complaints and found that both of them can be simply fixed. And in this guide, I’ll tell you how. But first, let’s have a look at the steps to extract the boot.img from boot.img.Iz4 file and root the device.
How to Extract Boot.img from boot.img.Iz4 and Root Samsung
I have given the instructions in separate sections to facilitate better understanding. And don’t skip any step to prevent secondary issues. Just follow the exact order as mentioned in the guide.
Step 1
Unlock Samsung Bootloader
This is the very first step. You can refer to our guide to learn how to unlock the bootloader on any Samsung Device.

Step 2
Download Samsung Stock Firmware
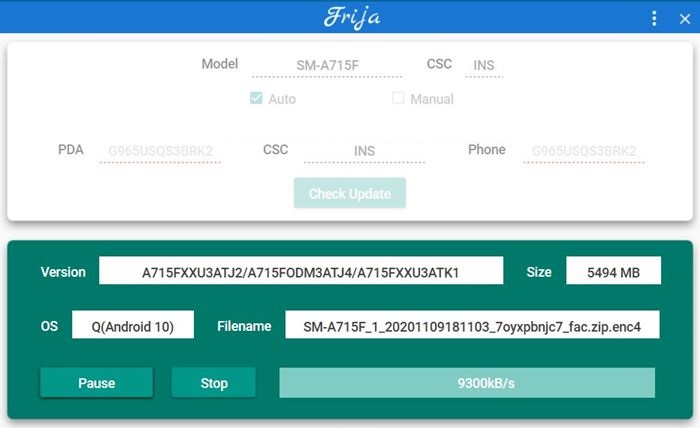
Secondly, you need to download the stock firmware for your phone. I recommend you to use the Frija Tool. But you can use the SamMobile site too. You can see the instructions on how to download Samsung stock firmware/ROM via Frija Tool by clicking here. For demonstration purposes, I am using the Samsung Galaxy A71.
For Frija:
- Model: SM-A715F
- CSC: INS
For SamMobile
- Model: SM-A715F
- PDA: A715FXXU3ATJ2
- CSC: A715FODM3ATJ4

Once you have downloaded the firmware just extract it to a convenient location on your PC. Now you will have the AP, BL, CP, CSC, and Home CSC files. Then, let’s have a look at the next step.
Step 3
Patch AP firmware file using Magisk
As the third step, take the AP file you got from the extraction and transfer it to the phone. Next, install the Magisk Manager app on your phone and patch the AP file. You can read the patching instructions by clicking here. Please be patient as this process takes some time. In the end, you will get the magisk_patched.tar file. And you need to transfer the file to the PC.

Step 4
Extract magisk_patched.tar file
As we are dealing with a TAR file, I recommend you download and install the 7ZIP software on your PC. That is because WinZip or WinRAR cannot handle TAR files efficiently.
Now, follow my lead.
- Right click on the magisk_patched.tar file and select 7ZIP > Extract to magisk_patched.
- So that a magisk_patched folder will be made with the extracted content of the magisk_patched.tar file.
- Now you have to delete all the files within the folder except recovery.img and vbmeta.img.

Step 5
Extract AP firmware file
- Go to the original AP file you got from the stock firmware.
- Extract it on your PC. The contents will be extracted within the AP_version-number.tar folder.
- Now you need to get the boot.img.Iz4 file from the extracted AP file.

Step 6
Extract Samsung boot.img.Iz4 file
- Firstly download the LZ4 extraction tool from this link. lz4_win32_v1_9_3.zip :32-Bit Windows, lz4_win64_v1_9_3.zip: 64-Bit Windows
- Extract the tool and transfer the boot.img.Iz4 file to the Iz4.exe file of the tool.
- Once the extraction is finished you will get the boot.img file.
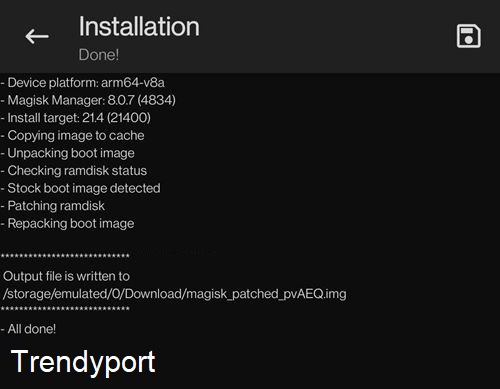
- Just transfer it to the phone and patch it using Magisk. So that you will get the magisk_patched.img file in the Downloads folder.
- You can see the patching steps by clicking here.
- Again transfer the file to the PC and rename it to boot.img.


Step 7
Create a new AP Patched file for your Samsung phone
- Now transfer the boot.img file to the magisk_patched folder. (The one you got in step 4)
- And you will see 3 files in that particular folder: boot.img, recovery.img and vbmeta.img.
- You have to select all 3, right click on them and select 7-Zip > Add to Archive.
- Next change the Archive format to tar and click OK.
- Now you have the freshly made AP Patched firmware file.


Step 8
Boot Samsung device to Download Mode
As you have all the required files now, the next step is to flash them using Odin. But before that, you need to boot the phone into download mode. Because Odin is only capable to work in download mode. You can learn how to boot any Samsung Device to download mode by here.

Now, connect the phone to the PC using a USB cable and move to the next step.
Step 9
Root Samsung using boot.img.Iz4 file
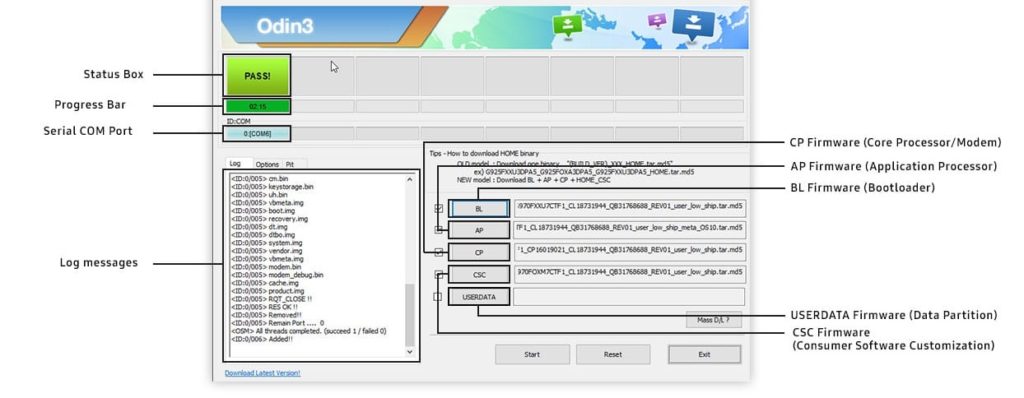
- Firstly download the Odin tool to your PC, launch and load the files given below.
- Just leave the userdata blank.
- When the files are loaded, navigate to the Options section of Odin and untick Auto-reboot.
- Lastly press the Start button and wait untill the process is completed. You will see this message when the process is finished.

Step 10
Reboot the rooted Samsung Phone to OS using boot.img.Iz4
This is the last step. And you can see the detailed instructions by referring to our guide on how to boot rooted Samsung to recovery mode and rooted OS.

When the device reboots to the OS, you have to launch the Magisk Magisk Manager app. Allow it to download few configuration files by clicking OK. So that the device will reboot automatically completing the root!
FAQ
Samsung Bootloop Fix after Root
As I have mentioned in the beginning, you might end up in a boot loop after completing step 10. Here’s how you gonna fix it.
- First reboot the device to Recovery Mode using hardware keys.
- Next mount the system partition using the Mount/system option.
- Now you need to perform factory reset by using the Wipe Data/Factory reset option.
- Then select Reboot System Now.
- You can launch the Magisk Manager app and continue the rest of the setup after the device boots up.