Top 5 Ways to Fix Windows 10 Keeps Restarting after Update
Question: I recently installed the 2018-02 Cumulative Update for Windows 10 Version 1709 for *64-based Systems. After that my PC keeps restarting to finish the installation. And the View Installed update history says “Requires a restart to finish installing”. Can you help me? Thank you very much.
Nowadays this is a very common scenario. And a very annoying issue actually. Especially there is a high probability of experiencing this issue if you updated from Windows 8.1, or 7. Fortunately, there are several ways to fix the problem.
When considering the causes behind the issue, there are two. The first one is a bad registry and the other one is a corrupted driver. So the fixing includes removing bad registry and fixing the damaged driver. Before moving into that, you have to disable the automatic restart. Here’s how:
- First, turn on the computer and keep pressing F8 until you see the boot menu.
- Then select Safe Mode in the boot menu.
- Once the Windows is booted up, go to the Search tab and type sysdm.cpl and hit Enter.
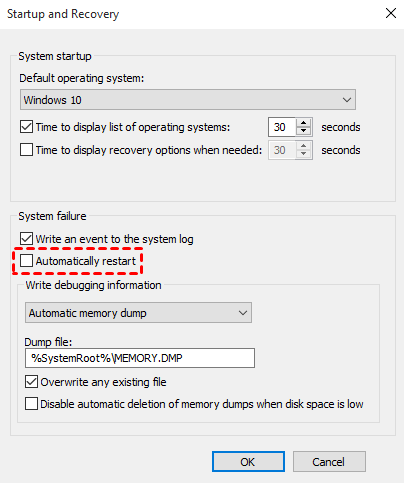
- Under Startup & Recovery click on Advanced>Settings.
- Then uncheck Automatically restart.

- Finally, click OK and restart the PC.
NOTE: This process only solves the issue temporarily. So you have to follow the next steps to completely get rid of the problem.
How to Fix Windows 10 Update Keeps Restarting
1. By Removing Bad Registry
As this is a very advanced fix, a tiny error may damage your computer. Therefore, please make sure to create a full system image backup before performing this.
- First, open Run Window and type regedit in order to open the Registry Editor.
- Then go to: HKEY_LOCAL_MACHINE\SOFTWARE\Microsoft\WindowsNT\CurrentVersion\ProfileList.
- After that scan through the ProfileList IDs and remove any with ProfileImagePath found in it.

- Once done, exit Registry Editor and restart the computer.
2. By Fixing Driver Issues
It is a well-known fact that Windows 10 has trouble with AMD graphics. So the culprit of your restarting issue might be the outdated graphics drivers.
Let’s fix that.
- First, open the Control Panel and choose Performance and Maintenance.
- Then select System > Device Manager and see whether there is a yellow exclamation mark beside any of the listed hardware.
- If so, right-click on the devices with a yellow exclamation mark and click on Properties.
- Then click on Troubleshoot under the General tab and follow on-screen instructions.
- If the above steps don’t work for you, navigate again to the device, and right-click on it. Again click Properties and select Update Driver. Finally restart the computer and see whether the yellow exclamation is gone.
- Still, it is not working you may need to install the driver again.
3. By booting computer via Bootable Disk
This is another method to fix the restarting issue. What you have to do is to create a bootable disk with a healthy Windows 10 PC. So that a powerful Windows backup utility AOMEI Backupper will help you.
Free download AOMEI Backupper Standard > go to Home > Tools > Create Bootable Media to make the bootable disk.
4. Refresh/Reset Windows 10
You are still encountering the problem after trying all the above methods, you can try refreshing or reinstalling the PC.
- First, turn off the PC and then turn it on. When you see the rotating loading circle press and hold the Power button. You may have to repeat this till you see the Preparing Automatic Repair screen.
- Once you see the Automatic Repair screen, select Advanced options to continue.
- Then select Troubleshoot and then Refresh your PC or Reset your PC.
Note: Refreshing your PC will keep the data but will remove the installed apps. Resetting will erase all of your files. Therefore don’t forget to backup your PC. You can learn how to backup Windows 10 for Fresh Install from here.
How to avoid the issue in the future?
Once the fixing is completed you have to take some preventive measures to avoid the error in the future. The best measure would be creating an image backup. With that, you will be able to revert your system to the previous state when you have Windows 10 infinite loading issue, or Windows 10 continuous reboot or other system issues.
So to create the backup we recommend you use free AOMEI Backupper. Because it is user-friendly software with many powerful features. Additionally, it lets you backup system, partition, disk, and files. And also you will be able to easily restore the PC to the previous state. Similarly, you can restore from bootable disk when you cannot boot your computer.
Here are the detailed steps to backup your computer.
- First, download AOMEI Backupper and open it.
- Then click on Backup and choose System Backup.

- You can select the destination path. And AOMEI Backupper supports many storage devices so you will be able to backup Windows to a USB drive, internal hard drive, NAS, cloud drive, etc.

- And to keep your backup up to date you can click on Schedule to enable regular backups. The regular backup will be an incremental one so it won’t take much disk space.
- Finally, click Start Backup.
That’s all for today. Hope this tutorial will help you. Meet you with another article soon!


