USB device not recognized Windows
USB devices are devices we use all the time. But sometimes when connecting a USB device to a Windows 10 PC, something has been reported by many users saying that an error is coming. When a mouse, keyboard, camera, or other device plugs into a USB port, does it display an error named “USB device not recognized”?
Don’t worry, in this article, we will show you how to fix this “USB device not recognized”.
We have listed below some of the problems that many users have complained about.
- Windows 10 does not detect USB
- The USB drive is not shown in Windows 10
- An external hard drive is not detected by Windows 10
- Windows USB ports are not working
Below are some of the ways you can try to solve these problems.
How to Fix Windows “USB device not recognized”
Method 1:
Disable Fast-Startup
Sometimes because of the Fast Startup option, Windows 10 may not be able to detect your USB device. So by turning this feature off, you can avoid the “USB device not recognized” error.
To do this, follow these steps:
Step 01
Access the Control Panel on your Windows PC.

Step 02
Once logged in, go to Hardware and Sound in the window and then go to Power Options.

Step 03
When the “Power Option” window opens, click on the “Choose what the Power button does“

Step 04
Click on “Change settings that are currently unavailable“

Step 05
Once you have it, find the “Fast-Startup” option and disable it.

Step 06
As a final step, click on the Save changes button, then restart your Windows 10 PC.

Your Windows 10 may slow down after the Fast Startup feature is turned off, but the USB drives you plug-in will start detecting.
Below are some of the ways you can try to solve these problems.
Method 2:
Update USB Drivers
In some cases of USB driver problems, Windows 10 may cause a “USB device not recognized” error.
All you have to do is go to your device driver’s official website and download the latest driver. Otherwise, uninstall the driver already installed on your device and allow Windows 10 to install the default driver.
Follow the steps below:
Step 01
Unplug your USB drive
Step 02
Press the Windows Key + X keys simultaneously and go to Device Manager from the list

Step 03
When you go to the Device Manager window, double click on the Disk Drives

Step 04
Now right-click on your USB drive name and select Uninstall device

Step 05
Once your USB driver is uninstalled, Restart your PC
Step 06
Now, after your Windows 10 PC is started, plug in a USB drive to see if your USB drive is detected by Windows 10.
Method 3 :
Separate your USB storage into partitions
If none of the above fixes your error, follow these steps.
Step 01
In the Windows search bar, type Computer Management, select Computer Management from the list, and then log in.

Step 02
When the Computer Management window is open, click on Disk Management on the sidebar.

Step 03
To find your USB drive, look for something called Unallocated Space. If your USB drive is not partitioned, it will appear as Unallocated Space.

Step 04
Right-click on it and select New Simple Volume

Note: If your USB storage is already partitioned and Windows 10 is not detected, make sure you have a letter assigned to it.
To assign a letter to partition, follow these steps:
- Go to Computer Management as described above and go to Disk Management
- Find your USB drive and right-click on it
- From the drop-down list, select Change Drive Letter and Paths

- As a final step, click on ADD in the next window and select your preferred letter from the drop-down list and press the OK button.

Method 4 :
Uninstall Hidden Devices
Typically, Windows 10 will not detect every device installed on the system. In general, Windows 10 only shows the currently connected devices. To illustrate, suppose you installed a USB printer some time ago. But you didn’t use it for a long time? If that happens, even if it is installed on the system, the Device Manager will not show it.
So how do you look for hidden devices in Device Manager? The steps below will help you do just that.
Step 01
Open the command prompt on your Windows 10. To do this, simply press the Windows Key + R keys at the same time, type cmd in the Run box and press the OK button.

Step 02
Once the Command Prompt window is open, paste the following commands separately and press Enter.
- set devmgr_show_nonpresent_devices=1
- cd
- cd windowssystem32
- start devmgmt.msc

Step 03
When the Device Manager loads, click on the View tab and select Show Hidden Devices.

Step 04
Now expand all the sections like Imaging Devices, Universal Serial Bus Controllers, and Unknown Devices. If you see something in gray out or labeled “unknown device“, right-click on it and select uninstall.

Step 05
When all this is done, Restart your Windows 10 PC and connect your USB drive to PC again.
Method 5 :
Remove Unrecognized Devices from Device Manager
Step 01
Go to Device Manager as I mentioned earlier and go to the Universal Serial Bus Controllers section
Step 02
Expand that section and see if there is something called Unrecognized Device. If there are any, right-click on it and select Uninstall device.

Step 03
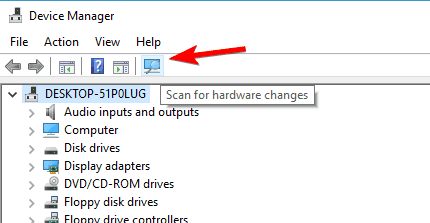
Click on the “Scan for hardware changes” button because the missing drivers are not installed by Windows.

Step 04
Close the Device Manager and go to Computer Management by pressing Windows Key + S as discussed above. Then go to Disk Management.
Step 05
Assign a new letter to your USB storage by following the steps I mentioned above.
Method 6 :
Connect the USB drive to the USB ports on the back
If you are using a Seagate hard drive, it can cause this error as well. Because if you connect your USB drive to the USB ports on the front of your PC, Windows 10 may not detect it. Whether you are using a Seagate hard drive or not, always use USB ports on the back of your PC when plugging in a USB drive. This is because the USB ports on the back are directly connected to the motherboard and USB ports on the front do not produce enough power to detect your device.
Method 7 :
Assign a letter to USB storage through the Diskpart tool
Step 01
Open the RUN dialog box by pressing Windows Key + R keys, then type “diskpart” and press OK.

Step 02
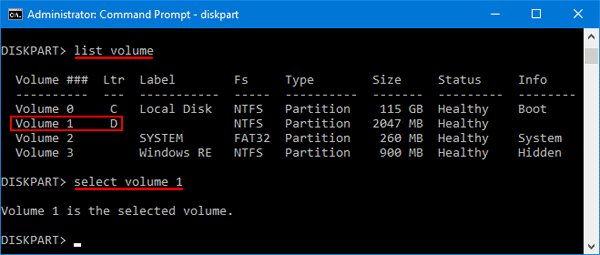
Once the Command Prompt is open, type list volume and then press the Enter key.

Step 03
Find your USB storage from the list listed there. Remember, your USB storage must have not assigned a letter.
Step 04
Now type “select [your USB storage name]” and press Enter
Ex: select volume 1

Step 05
Then type “assign letter Z” (a letter of your choice) and press Enter

Step 06
As a final step, close the Command Prompt and check if your USB drive is detected.
Connect with us
We would like to hear about your problems, questions, and suggestions. So feel free to contact us. This is free of charge service that we offer. But we receive thousands of emails per day. So it is impossible to reply to all of them. So we create a Community to help you individually. go to Community and open help Topic under Android. Please spread this post to your friends by sharing Facebook and other major social media. And make sure to like us on Facebook.
