Flash Stock Rom on Samsung Galaxy A7 2017 SM-A720F – Welcome to Our Flashing Tutorial on Samsung galaxy. In this post, I am going to explain the step by step process of Flashing Stock Rom on Samsung Galaxy A7 2017 SM-A720F using Odin Flash Tool and I give you all the original firmware and Odin tool that suits your Samsung Galaxy. Furthermore, To help with your common Flashing issues, I’ve brought up the FAQ section. If you are searching FAQ or Complete Flashing Guide then, continue reading this article as it can help you in one way or another. Read more – Stock Rom vs Custom Rom
Why I want to Flash Samsung Galaxy A7 2017 SM-A720F Firmware
You have to Flash your Samsung Galaxy A7 2017 SM-A720F under various circumstances. If you Flashed custom ROM or Custom recovery or performed root on your device and now you want to Unroot, Unbrick, Rollback, back to Stock Firmware. or if you want to Upgrade or Downgrade your Android Device OS then you will need to flash the stock firmware. Furthermore, if you got errors like the Black Screen of Death issue, Boot loop issue, massive lags, soft bricks, overheating, unexpectedly shut down then you have to perform this operation to bring your device back to its original state. Read More – Stock Rom vs Stock Firmware
Requirements for Flashing :
- Read More – Increase RAM SIZE after root on Device?
- Download the Stock Firmware for your device.
- Download latest Odin flash tool
- Use Original USB cable and working laptop.
- Maintain at least 60% of the battery percentage.
- Enable USB debugging and OEM unlock
- Beginner Guide for Odin Flash Tool ( BGOF )- Please Read this and go to Flashing Operation.
WARNING!
Flashing Stock Firmware on Samsung galaxy can erase all of your data.
All described operations, you are doing at your own risk.
If you want to save data get a backup before start.
Preparation for Flashing Stock Firmware on Samsung Galaxy A7 2017 SM-A720F
Step 1
- Download Samsung USB Driver and install it to Your Computer. If you already install USB Drivers, then skip this Step.
Download Odin Tool For Samsung Galaxy A7 2017 SM-A720F
Step 2
- Download Odin Flash Tool and Extract it to Your Computer

Download Stock Firmware For Samsung Galaxy A7 2017 SM-A720F
Step 3
- Download Stock Firmware for your Samsung Galaxy A7 2017 SM-A720F (Just type Model Name and Download ) and Extract it to your Computer.
- If Downloaded File Contains Only one or 2 files (If you can’t see the 4 .md5 files) then, use this guide to Flash your device.

Step 4
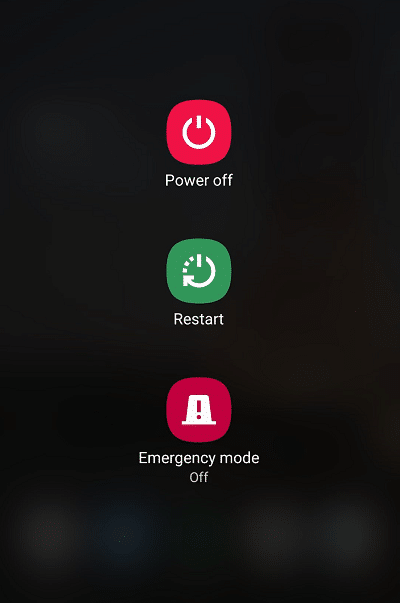
- Turn Off your Samsung Galaxy A7 2017 SM-A720F Samsung Galaxy
Step 5
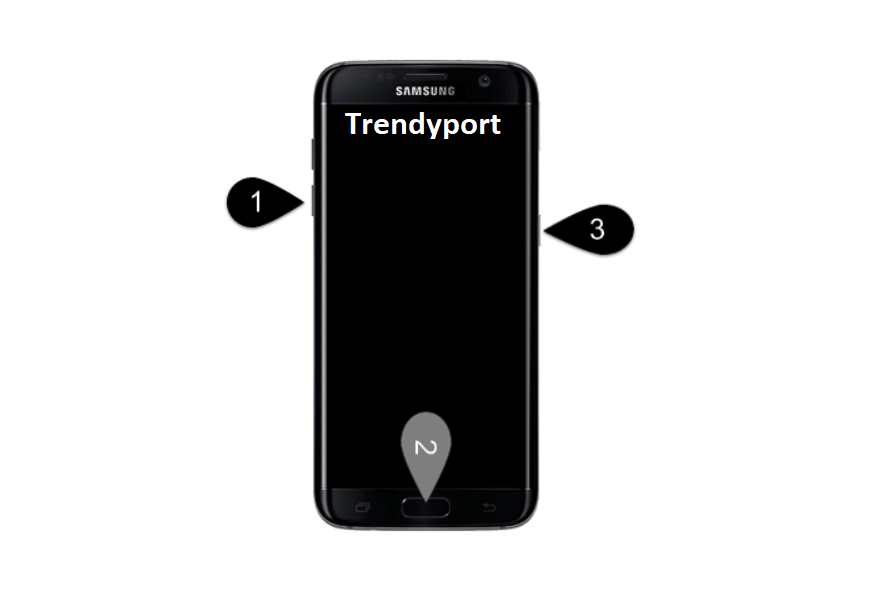
- Now you can Boot to Download Mode. to boot Download Mode, Press and Hold Volume Down +Power + Home Key at the same time for 6-10 Seconds
Step 6
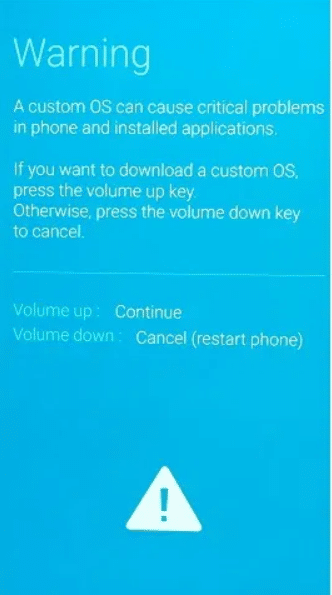
- If you have booted into Download Mode successfully, You can see Warning Triangle on the Screen.
Step 7
- Open Odin Tool from Computer (You have Downloaded it in Step #2 )
- And Connect Your Samsung Galaxy A7 2017 SM-A720F to Computer using Original USB Cable
- Press the Volume up button to Continue.

Step 8
- Once Samsung Galaxy A7 2017 SM-A720F is connected to Computer, Odin will Automatically Detect and Display message “Added” in Odin Log area

Step 9
Now, we should add our downloaded 4 files to the Odin tool.
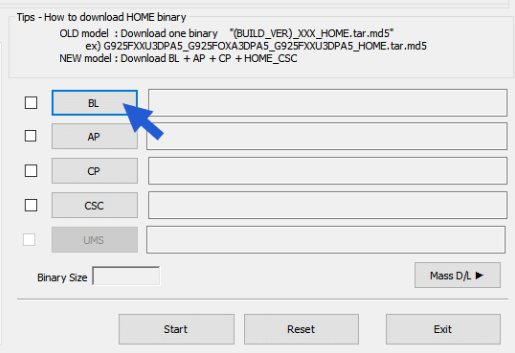
- 1st File – Click BL Button and select BL file from Downloaded Firmware Folder.
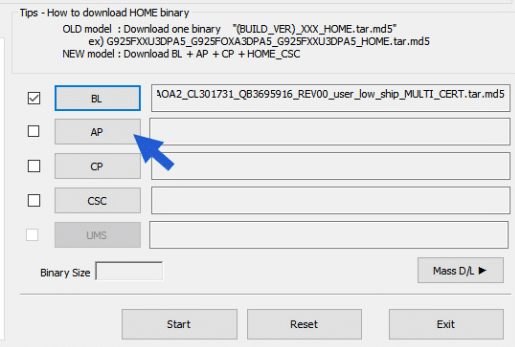
- 2nd File – Click AP Button and select AP file from Downloaded Firmware Folder.
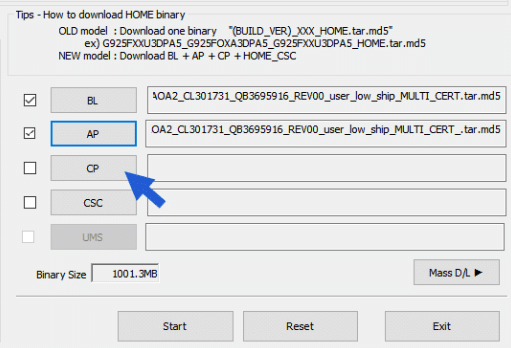
- 3rd File – Click CP Button and select CP file from Downloaded Firmware Folder.
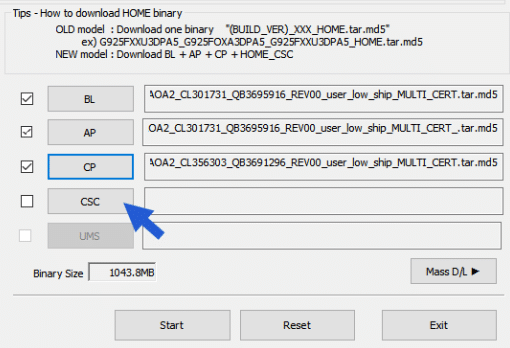
- 4th File – Click CSC Button and select CSC file from Downloaded Firmware Folder.
Installing Stock Firmware on Samsung Galaxy A7 2017 SM-A720F
Step 10
- Now, we can start Flashing Process. Click the “Start Button” to Begin Flashing Process. This process may take 10 Min to fully complete.
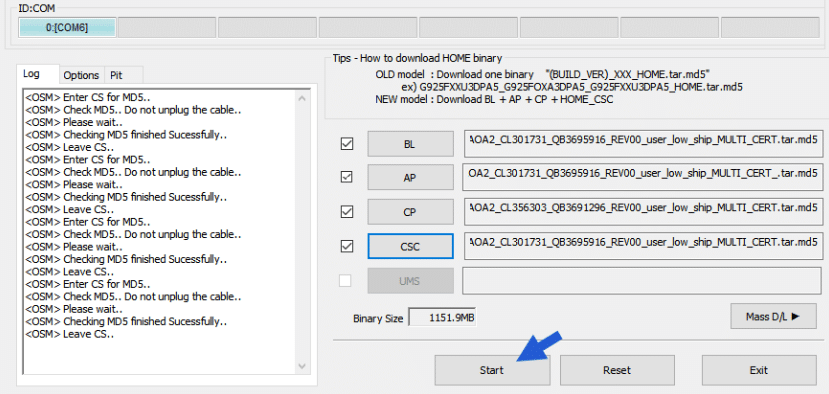
- After Flashing Process complete, Odin will indicate the Green “Pass” message. now you can disconnect your Device from Computer.
- You will see your Samsung Galaxy A7 2017 SM-A720F is getting Restarting. if not, Restart the device manually.
Step 11 Optional
- Factory reset your Samsung Galaxy A7 2017 SM-A720F device and make sure all is well
Frequently Ask Questions :
I can’t Flash Stock Rom on Samsung Galaxy A7 2017 SM-A720F

There is no other ways to flash the Samsung devices. So do it again with the latest Odin tools and fresh Samsung firmware (it is better to download files from another server). If your problem persists then, please open Help topic with details under android in our Forum
Samsung Galaxy A7 2017 SM-A720F doesn’t turn on, not respond to power button ( Dead/Soft Brick)

- Let’s be a little more patient. Because the Flashing process takes some time. (20min)
- If there is no progress then, download Firmware and latest Odin from another source and try again.
- If your problem persists then, please open the Help Topic with details under android in our Forum.
Samsung Galaxy A7 2017 SM-A720F Doesn’t not pass boot logo/ boot-loop
- after flashing, the Samsung Galaxy does not pass the logo and keeps restarting until the logo. That means the phone is stuck in the boot loop. so, we have to take action for this. But is this the first time after flashing? Give it time. (20 minutes)
- If your problem persists then, please open the Help Topic with details under android in our Forum.

Samsung Galaxy A7 2017 SM-A720F continuously restarts/ keep rebooting
![]()
- Follow this Guide-line again with Fresh Firmware and Odin tool from another source.
- We also have some dedicated posts about this. you can Search them.
- If your problem persists then, please open the Help Topic with details under android in our Forum.
Phone automatically disconnecting during flashing
- Use Different USB Port
- After that run Odin Flash Tool as administer.
- Make sure you have the correct driver installed
- If the problem persists then use another PC
USB device not recognized
- This is a normal USB error and it is not related to Odin. The only thing you can do is change the USB port, try with another cable, try with another Computer.
- if you need to fix this problem first, then go to this troubleshooting guide. However, it is better to bookmark this page for future use.
Error displaying “secure check fail” / FAIL on Samsung Galaxy A7 2017 SM-A720F
- won’t boot no Samsung logo just flashes in red “secure check fail Modem” then blue screen security error phone is locked
- You may try to install the wrong version. the reason is: The mobile phone has been replaced with an incorrect ROM that is not “original/legal” for his motherboard. So, Download Right Country, Latest Version, Right Model. If your problem persists then, please open the Help Topic with details under android in our Forum.
Samsung Galaxy A7 2017 SM-A720F “SW REV.CHECK FAIL! DEVICE: BINARY
- The Odin notification box displays a “failed” message while Odin-mode displays the message “SW REV.CHECK FAIL! DEVICE: BINARY” in the device.
- The reason is: The mobile phone has been replaced with an incorrect ROM that is not “original/legal” for his motherboard. So, Download Right Country, Latest Version, Right Model. This is the only one Solution for “SW REV.CHECK FAIL! DEVICE:4 BINARY3”. – Read More – Fixing “SW REV.CHECK FAIL! DEVICE: BINARY
Screen showing a blank white screen
- This may sound scary, but it is the easiest problem that one can solve without any trouble. The problem reason is some mirror problems in primary memory. Although the whole phone works here, the screen does not work.
- Go again Download Mode and Download Firmware and latest Odin from another source and try again the above process.
Samsung Galaxy A7 2017 SM-A720F “Nand write start fail”

- Solving this bug in the Odin tool is difficult but not complicated. Nand is a non-volatile memory that stores data while the phone is off. When we install new firmware, Odin tries to write NAND, which is the first thing Odin does and this is the most important part in flashing.
- If the Odin logs are stuck at NAND Write for more than a minute or two, you can assume that there is something wrong with NAND Write that needs to be fixed. Make sure that OEM Unlocking is enabled, Use Odin version 3.13.1, try again above Process again. Read More – Fixing Nand write start fail
Can’t open the serial(com) port on Samsung Galaxy A7 2017 SM-A720F
- Most probably this problem occurs due to USB driver issues.
- double-check whether you have enabled USB debugging and OEM unlock in developer options.
- Some of our users say this Custom Odin Version has helped them. try and tell us your success story.
Please get approval to use factory binary (Pit)
- Actually this is the most serious error. because Some solution works for some phones while some not. This Happen because of new security feature in Android Stock ROMS which strictly blocks the Flashing of custom ROMs
- Use the above Patch-Odin version and Flash the Stock Firmware Again. If not help, you should extract PIT file from CSC file. after that. insert the same in the Odin by going to the “PIT” tab in the Odin and by clicking the PIT button. Keep in mind that this should be done while trying to flash with the combination firmware. If you want step by step Guide, Read More – Please get approval to use factory binary (Pit)
Complete (write) operation failed
- This is a Normal error during Flash. There could be a lot of reasons.
- Solution: So first try the above step first. If it’s not working please double-check whether you have enabled USB debugging and OEM unlock in developer options. if still not works, then use this above Custom Odin Version
Install the android version that still not officially supported on Samsung Galaxy A7 2017 SM-A720F
- We know that some Samsung Galaxy devices have not yet received the latest Android Version, which also depends on the region (Samsung’s upgrade is based on region).
- Imagine that you are in Singapore and have a Pie on your device. If you want to upgrade to the latest android version and if the latest version is not supported in your country. Don’t worry. Still, you can flash the latest version, find the right model from the nearest country. Find the right Model number and flash it. (Not recommended but still working).
How to revert back to the previous version of Android
- When you flash a new custom ROM which found from the internet, you will inevitably get errors if it is still test-level. such as the camera fails, WiFi fails, the NFC Fails, the GPS fails, hotspot fails, Bluetooth Fails…
- But is there a chance to downgrade / Comeback to Android Marshmallow, Oreo, Nougat, Pie? I’d like to say. Yes. Find a suitable Android version and flash it like the guide above
Download Country/Carrier Based Stock Rom
You can see there are many versions on the same Samsung galaxy. Country / Carrier, PDA, CSC. This is because Samsung designs the operating system to targeting countries ( USA, US, Uk, Korea, India, Thailand, Philippine, Australia, Africa, France, Italy, Indonesia, Malaysia, China, Sri Lanka, German, Mexico, Brazil, Canada, Egypt, Bangladesh, Turkey, Poland, Netherland, Spain, Portugal, Czech Republic…) These Stock Roms are not different, but pre-installed applications and frequencies may be different. So, Select your country or the nearest country. (Nearest Country not recommend but you can try).
Connect with us
We would like to hear your problems, questions, and suggestions.so feel free to contact us. this is free of charge service that we offer. but we receive thousands of emails per day. so it is impossible to reply to all of them. so we create a Community to help you individually. go to Community and open help Topic under Android. please spread this post to your friends by sharing Facebook and other major social media. and make sure to like us on Facebook.